7 Riverview Drive, Guelph, Ontario, N1E 3R6,
Canada
Mon: 10:00am - 7:00 pm
Tu/W: 8:00am - 5:00 pm
Thur: 9:00am - 4:00 pm
Fri - Sat 9:00 am - 3:00 pm (alternating)

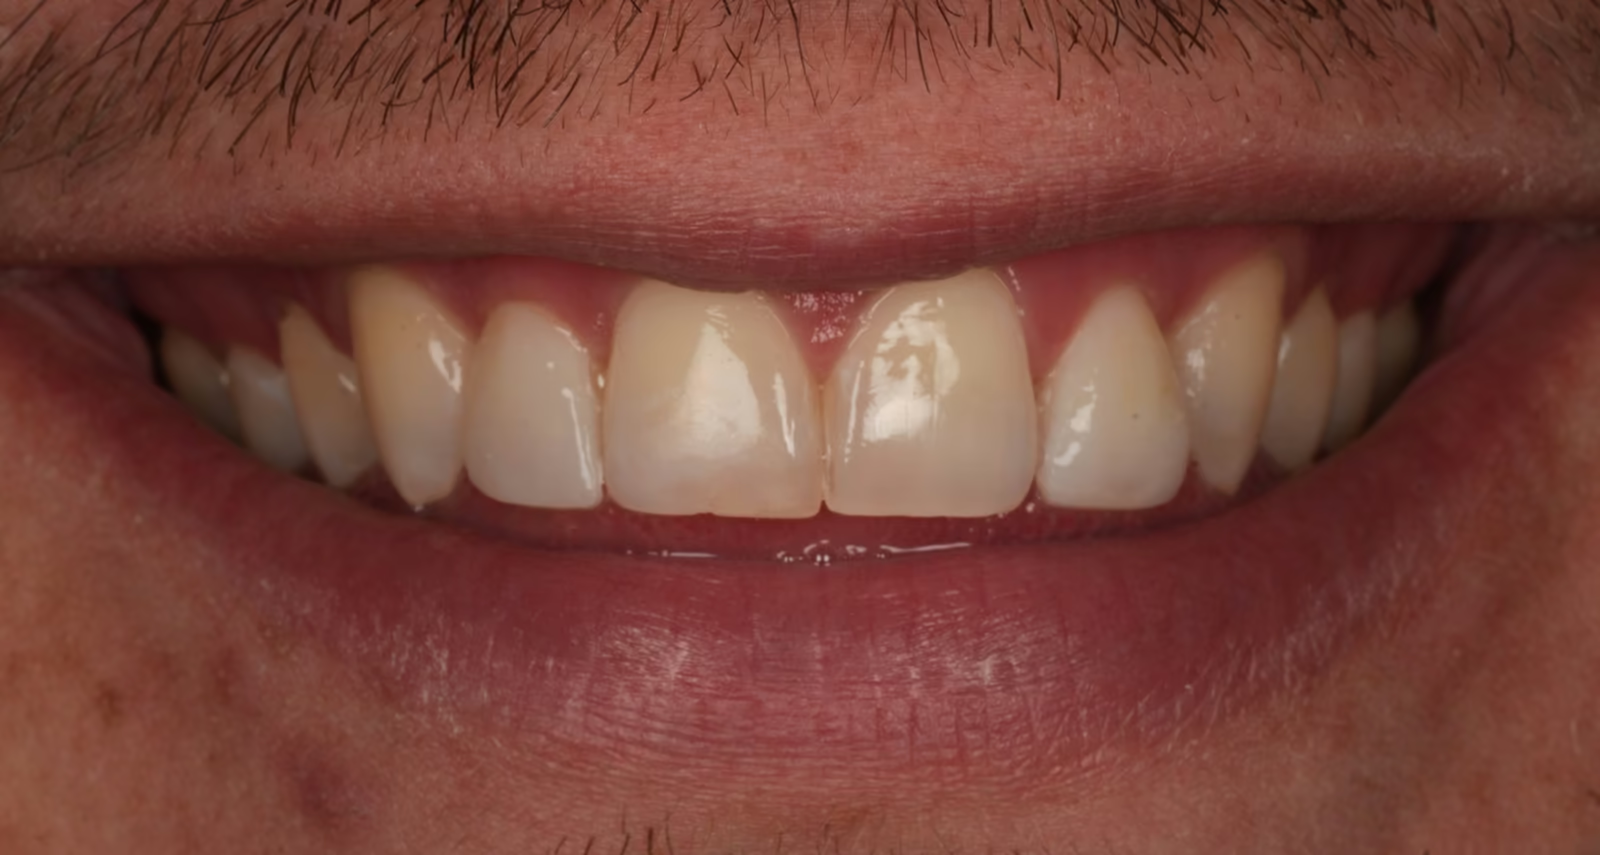
A three-to-four-month clinically document Invisalign case from Sunny Dental Centre, Guelph - Fixing a crooked tooth
The short version. An upper lateral incisor that sat behind the arch and kept chipping. Rather than repairing it a third time, we moved it into position with clear aligners and rebalanced the bite first, so the chipped edge could then be handled with polishing and a small repair instead of a crown. Active treatment ran three to four months, followed by retention. The full case study, month by month, is below.
Note the images and content below are content from a real clinic case and images with patient consent and written by Dr. Puri. The goal is to provide in-depth clinical cases for educational purposes by Sunny Dental Centre, this content is property of Dr. Puri and Sunny Dental Centre.
When a patient tells us one particular tooth keeps breaking, the tooth itself is rarely the whole story. Teeth are built to share force. When one tooth sits out of line; tucked behind its neighbours, rotated, or catching the bite at the wrong angle, it can end up taking force it was never meant to absorb. You can repair that tooth as many times as you like; until the position and the bite change, the repairs can keep failing.
This case study follows one such tooth: an upper lateral incisor that sat toward the palate, had chipped repeatedly, and had been bonded and re-bonded over the years. Rather than restoring it again; or removing tooth for a crown we repositioned it first with Invisalign clear aligners and rebalanced the bite, so that in the end only conservative small repair and polishing were needed.
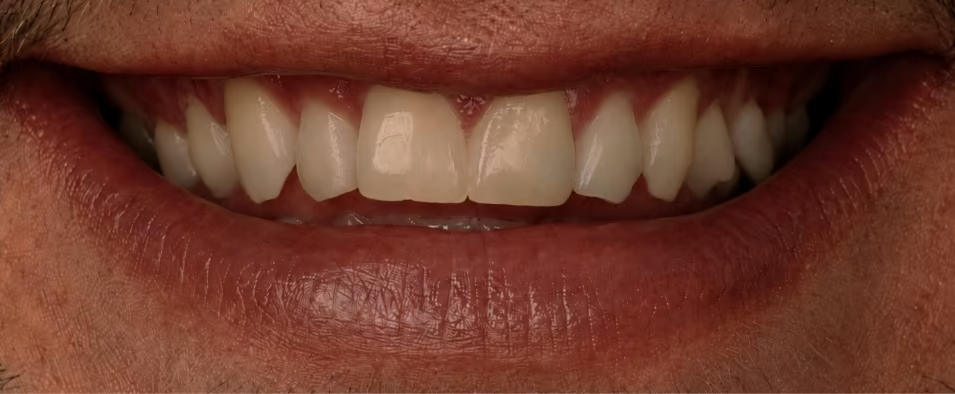
The patient came to us about an upper lateral incisor, one of the smaller teeth on either side of the two front teeth. It sat noticeably toward the palate, was rotated, and was constantly chipping. In fact, both of the upper lateral incisors sat behind the line of the arch, with one more severely affected. He had a history of clenching and grinding (bruxism), and the chipping tooth had previously been bonded and repaired more than three times.
His orthodontic history mattered too. Years earlier he had subscribed to a mail-order aligner company. That company later ceased operations, and he was left partway through treatment with no results, no follow-up, and no retainers. The movement he had achieved regressed once the trays stopped.
That history told us two useful things. First, his teeth had responded to aligner treatment before, which was encouraging. Second, it was a clear demonstration of something we tell every orthodontic patient: teeth have a natural tendency to move, and retention is a lifetime commitment. Movement without retention can be temporary.
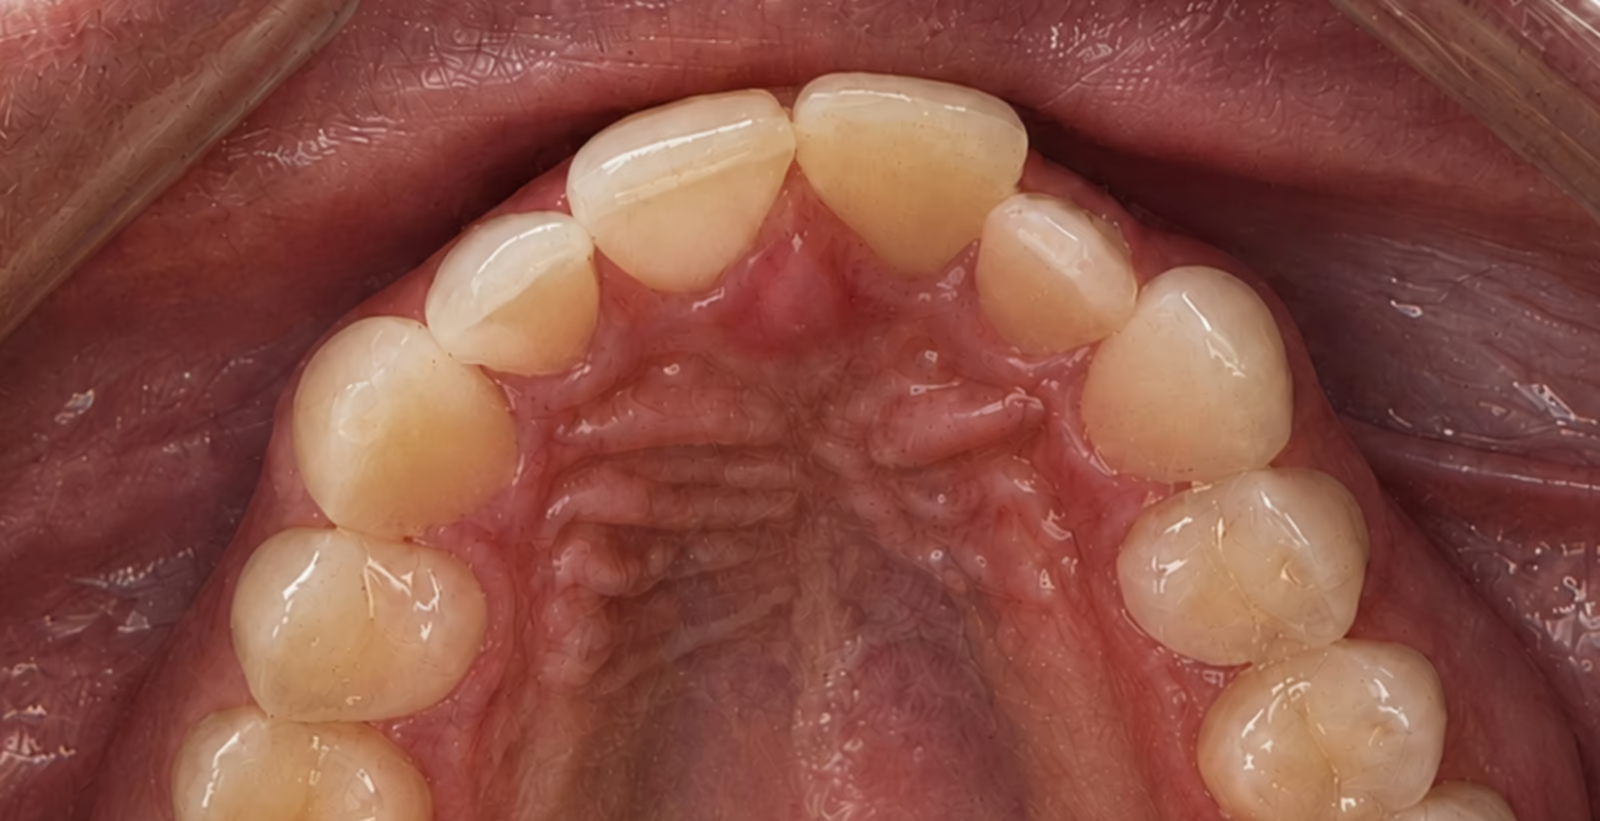
Every case starts with a clinical assessment aimed at the source of the complaint, not just the damage. The exam confirmed a history of bruxism and clenching, and repeated chipping of a tooth that had previously been bonded and restored. Assessment of the bite revealed minimal overjet (limited front-to-back clearance between the upper and lower front teeth) and positional interferences on lateral excursions — meaning the malpositioned tooth was catching force when the jaw slid side to side.
The problem list:
Diagnosis: malocclusion, with a history of tooth fracture.
We discussed the realistic options: no treatment, restorative repair alone (bonding again, or a ceramic crown), or orthodontic repositioning first, followed by restorative work as appropriate.
Repositioning first was our recommendation, for one central reason: a restoration placed on a tooth that is still taking interference tends to fail the same way the tooth did. Aligning the tooth and balancing the bite first meant that afterwards there would be no interferences loading that one tooth; neither when the jaw slides side to side (lateral excursions) nor when the front teeth guide it forward (anterior guidance). At that point, a future restoration would be protected and in this case, we anticipated that crown coverage would likely not be needed at all. A more conservative option, such as polishing and a small filling, could do the job. That is the difference between treating the chip and treating the reason for the chip.
The patient chose orthodontic treatment with clear aligners (Invisalign), which also allowed additional alignment improvements to be made during the same treatment.
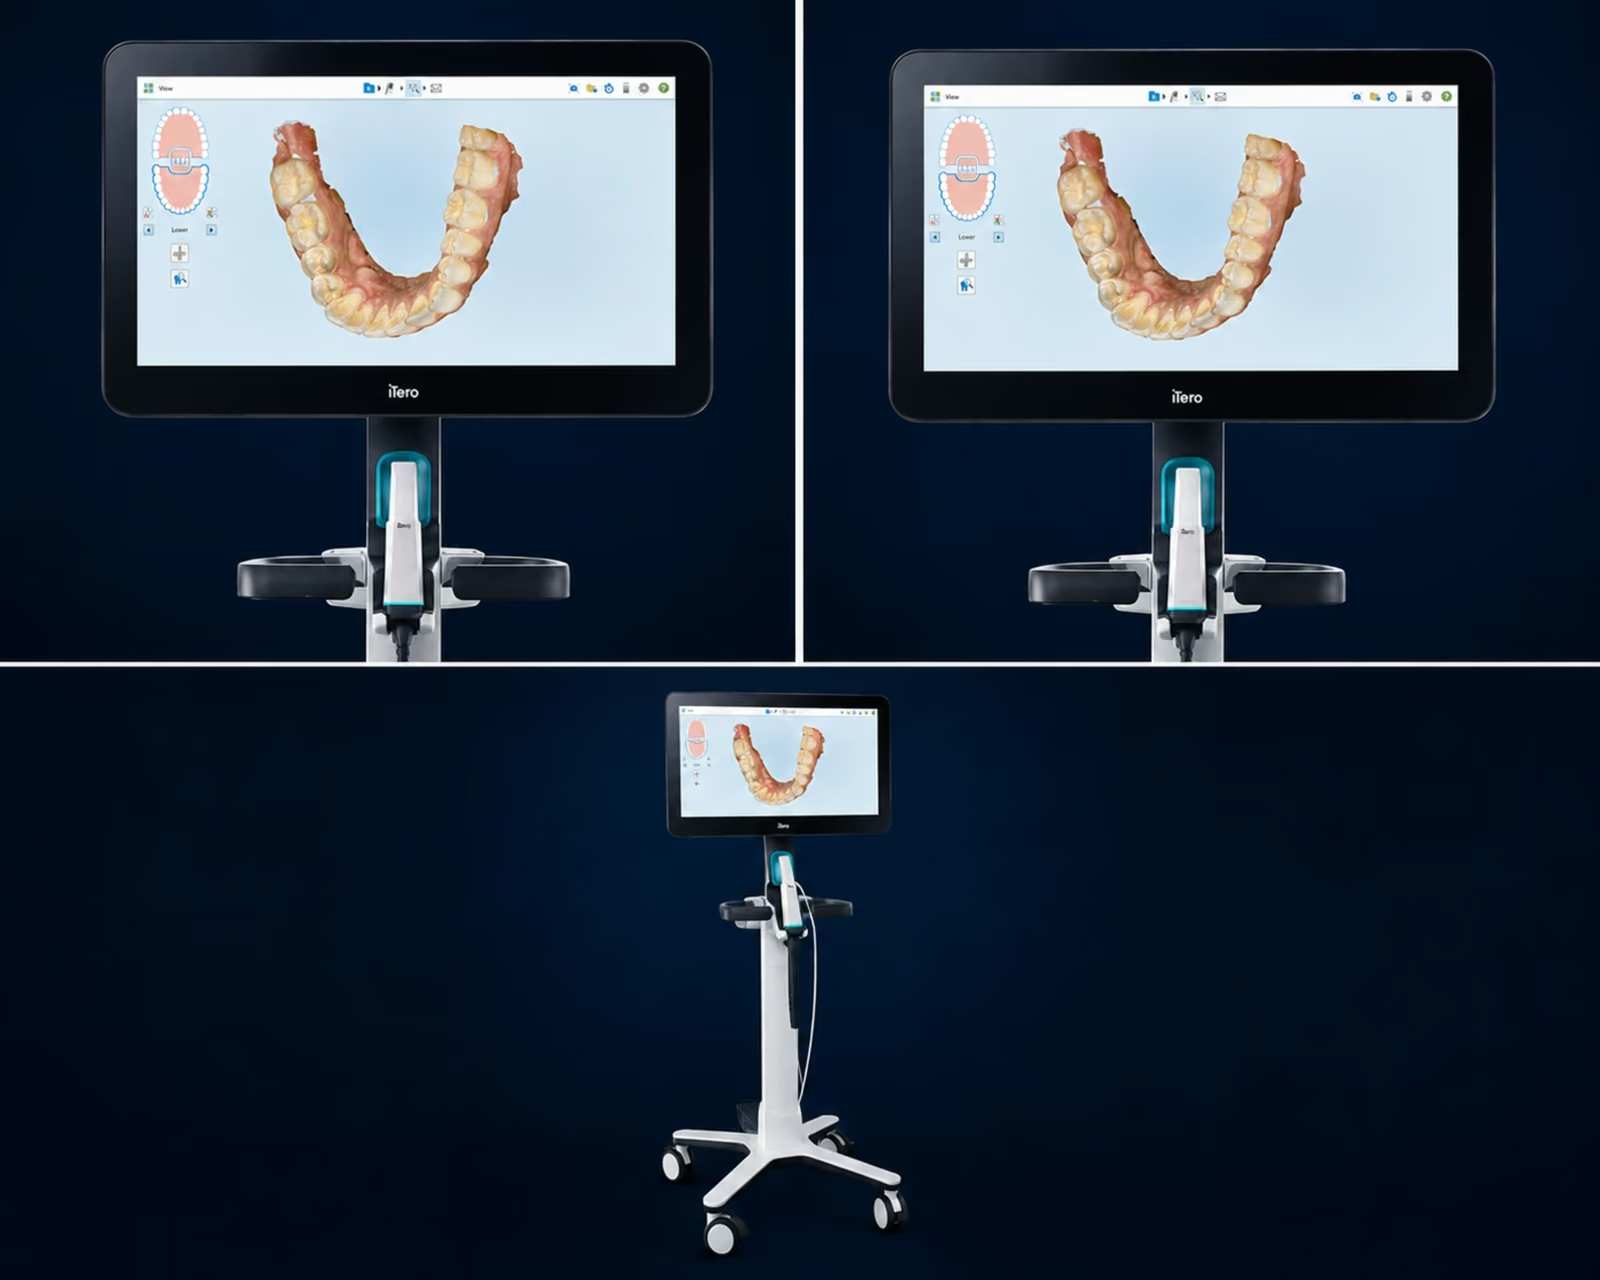
Every aligner and invisalign case requires a comprehensive workup. We took a full digital scan with an intraoral scanner (iTero) and completed a three-dimensional treatment plan using ClinCheck, Invisalign's planning software. The software stages the movements; which teeth move at each step, which serve as anchors and predicts where interproximal reduction (IPR) or attachments will be needed. The clinician then reviews and modifies that plan before trays are ordered.
One honest note about digital previews, because patients often ask: the 3D preview is a plan, not a promise. Independent reviews of aligner treatment find that most tooth movements are not predictable enough to finish with a single series of trays, refinement scans and additional tray series are a normal, planned part of how this treatment works, not a sign that something went wrong [2,3].
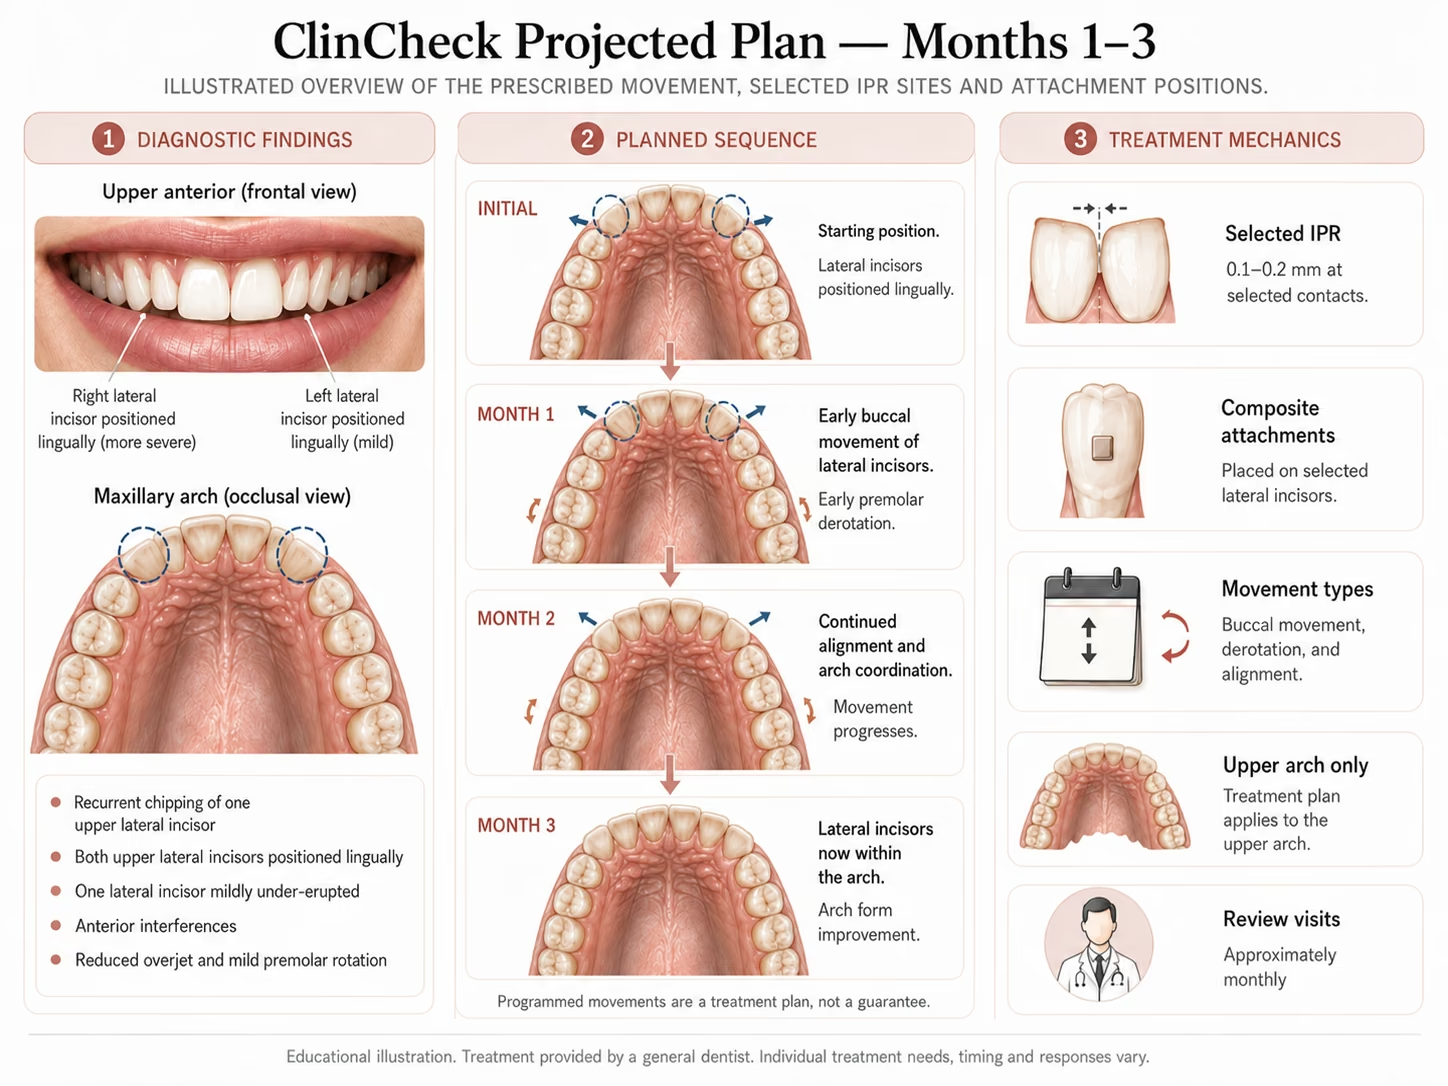
The plan called for IPR at a few contact points along the lateral incisors. Between 0.1 mm to 0.2 mm per contact. IPR removes a measured fraction of a millimetre of enamel between two teeth using a fine abrasive strip or tool, after which the surface is polished and the contact is verified. This small amount of space is enough to let the tooth move unimpeded, with minimal removal of tooth structure.
Is filing between teeth safe? IPR has been used and studied for decades, and follow-up studies have not found increased decay or gum disease in treated teeth [8] — though it is worth knowing those studies are older and small, which is why we keep IPR to the minimum the plan requires, polish the surfaces afterwards, and chart every site.
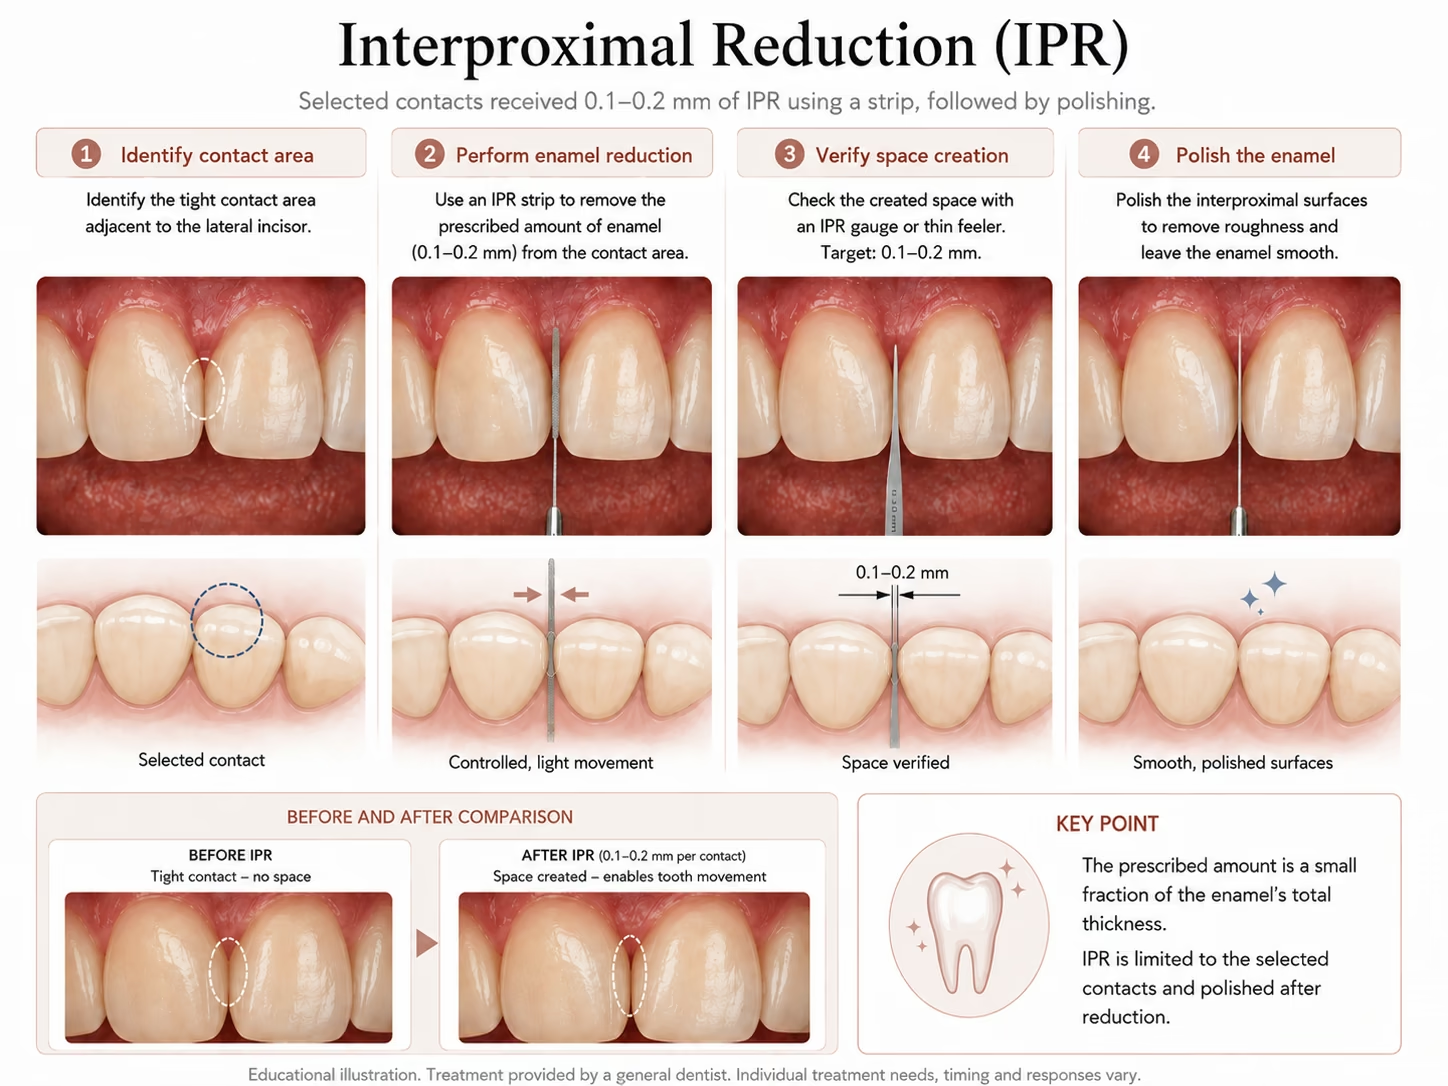
Composite attachments (often called buttons) were placed on the lateral incisors. These are small bumps of ordinary tooth-coloured filling material bonded temporarily to the tooth surface. They work like handles or door knobs: they give the tray something to grip so it can push and rotate the tooth. This matters especially for small, rounded teeth like lateral incisors, which the plastic otherwise grips poorly. Placing attachments requires no drilling and no anesthetic, and they are removed and polished off at the end of treatment.
At this stage we also noted an existing composite restoration on the upper left central incisor that was beginning to lift at its margin. It was monitored through treatment and addressed at the finishing stage.
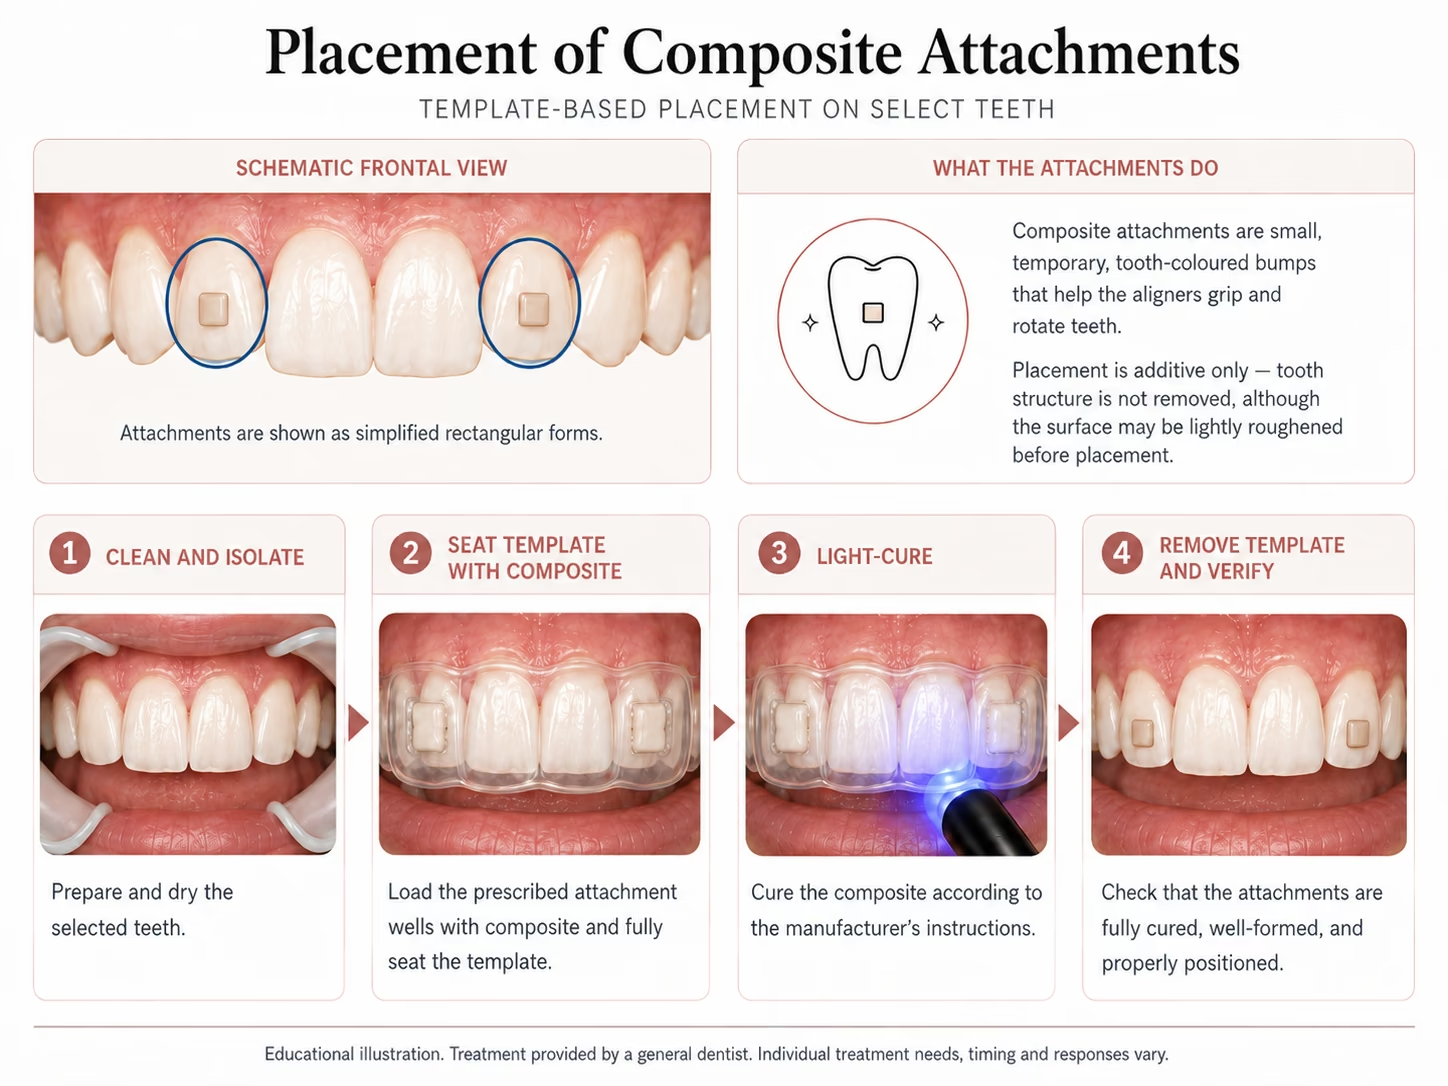
The patient was provided four weeks of trays at a time, each tray worn for about a week, with a follow-up roughly every month. Instructions were simple:
At each visit, before the next set of trays was issued, we confirmed that the current trays were seating fully on every tooth, that all attachments were intact and engaging the trays, that the gums showed no localized inflammation and oral hygiene was being maintained, that tooth mobility was within normal limits, and that the planned IPR contacts remained free so movement could continue. If a tray is not fully seating, issuing the next one anyway is how aligner treatment quietly goes off track; the fix is to slow down, not push forward and understand why. Note: In some cases, certain brackets may be removed or added at different phases of treatment and elastics used.
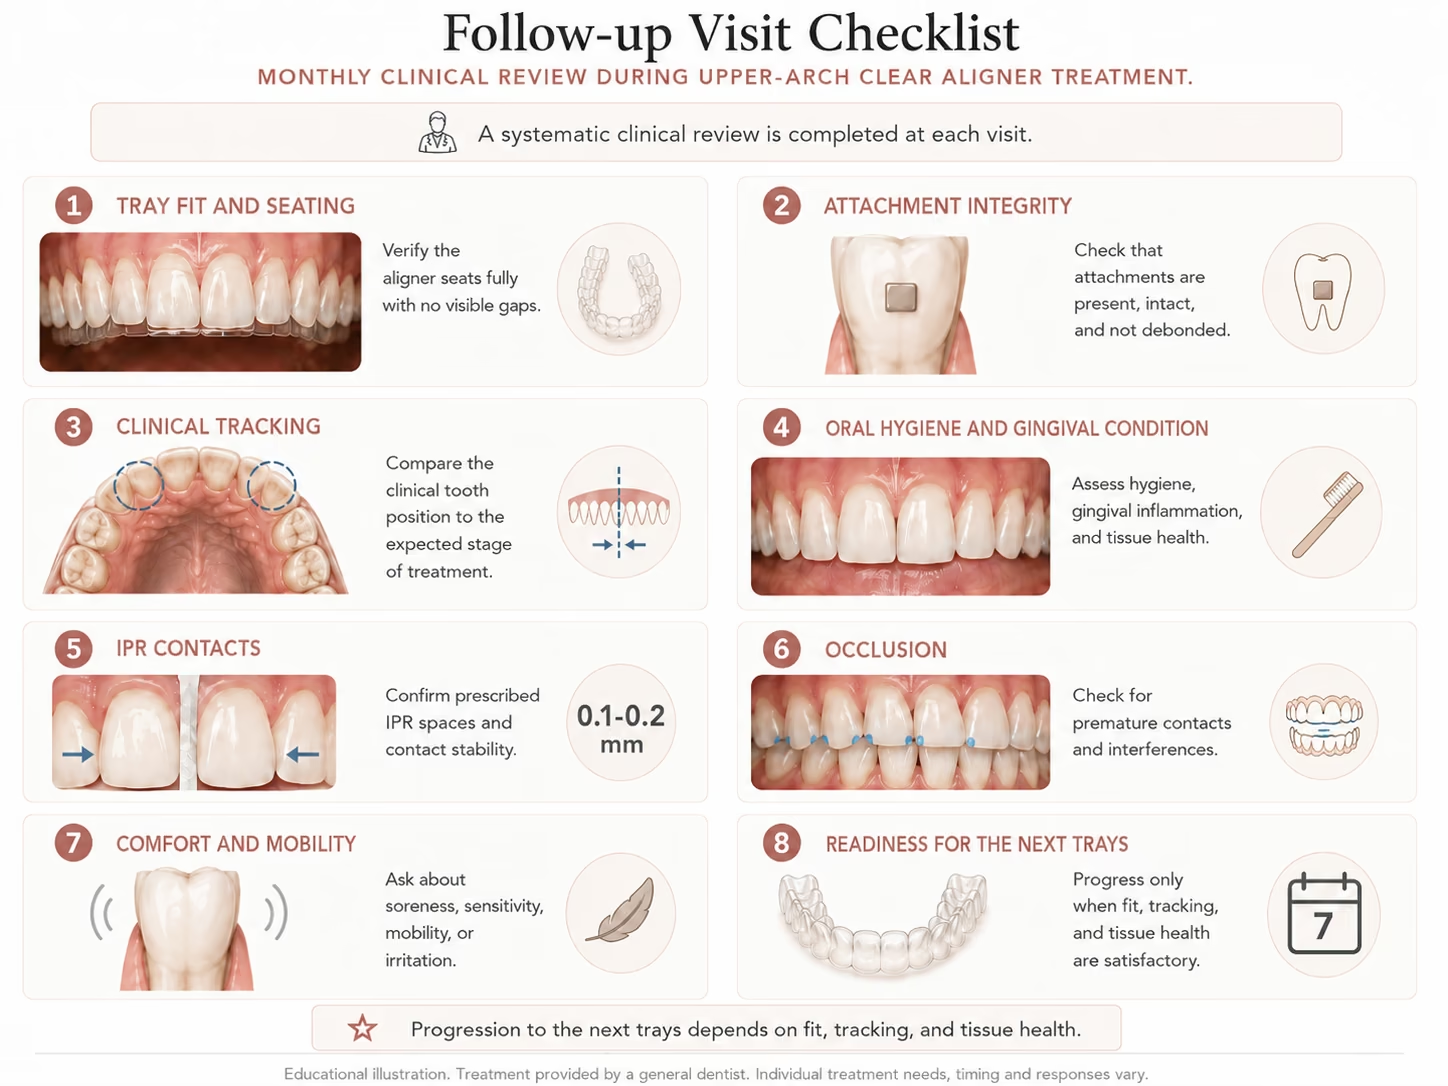
Individual results vary. The images below show this patient's treatment; what is achievable in any case depends on the teeth, the bite and the goals.
Active treatment in this case ran between three and four months. That figure excludes the retention phase, which, as we cover below, is in this casefull time use for 3 months and then nightly.
By the first follow-up, the lateral incisors were displaying buccal movement (tipping outward toward the arch line). The central incisors were inclining lingually (tipping slightly inward) as programmed, the premolars were showing early signs of rotating into better position, and the arch form was beginning to improve. The visual change in position was already clear.
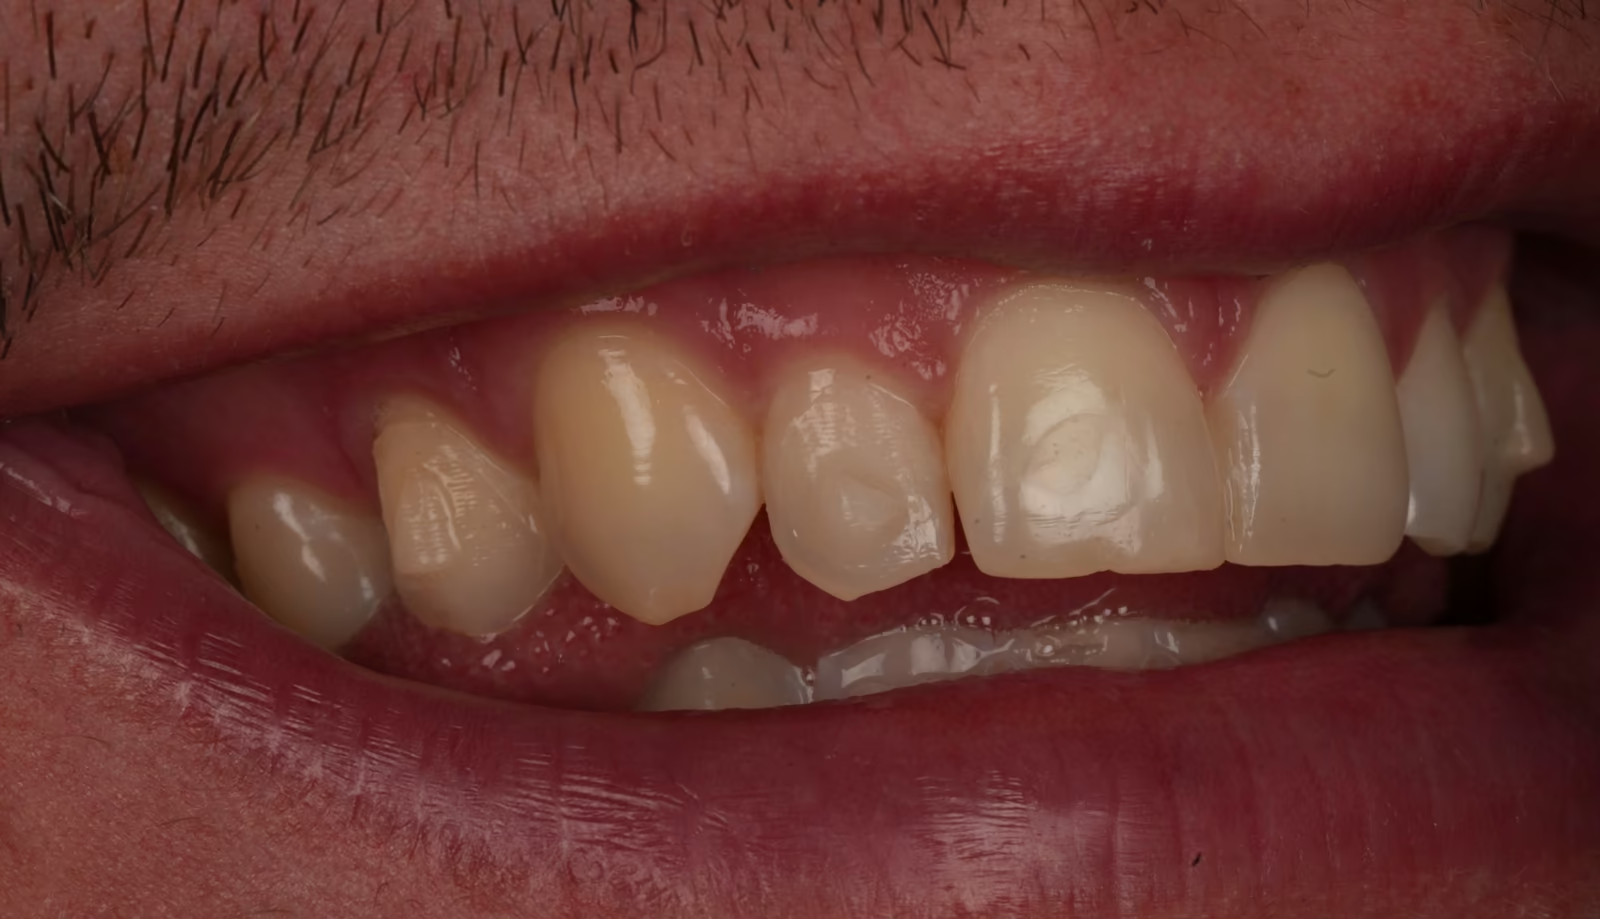
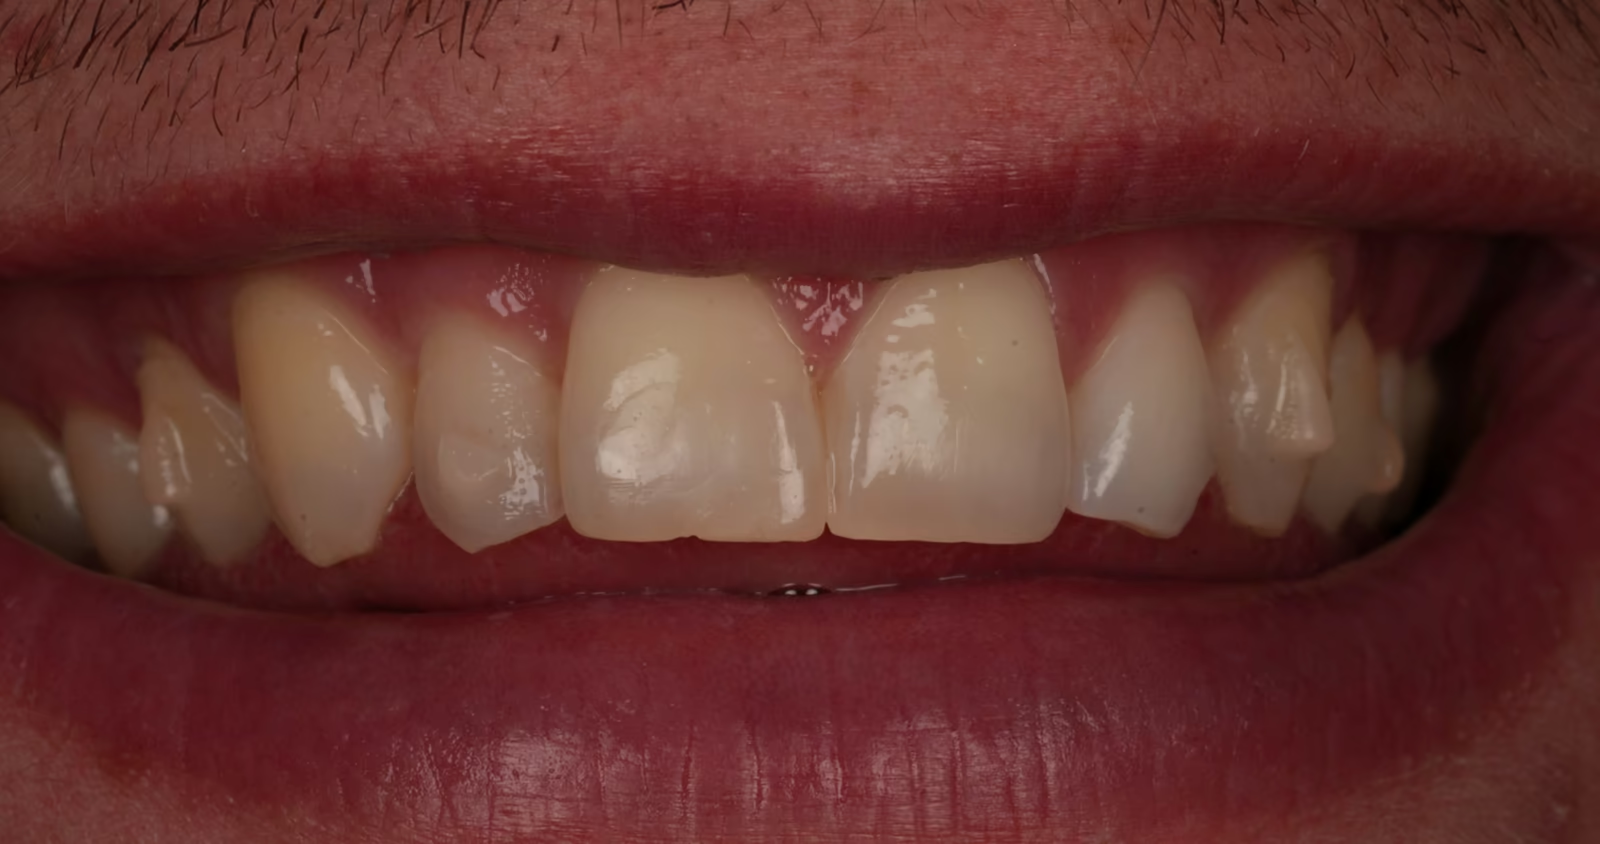
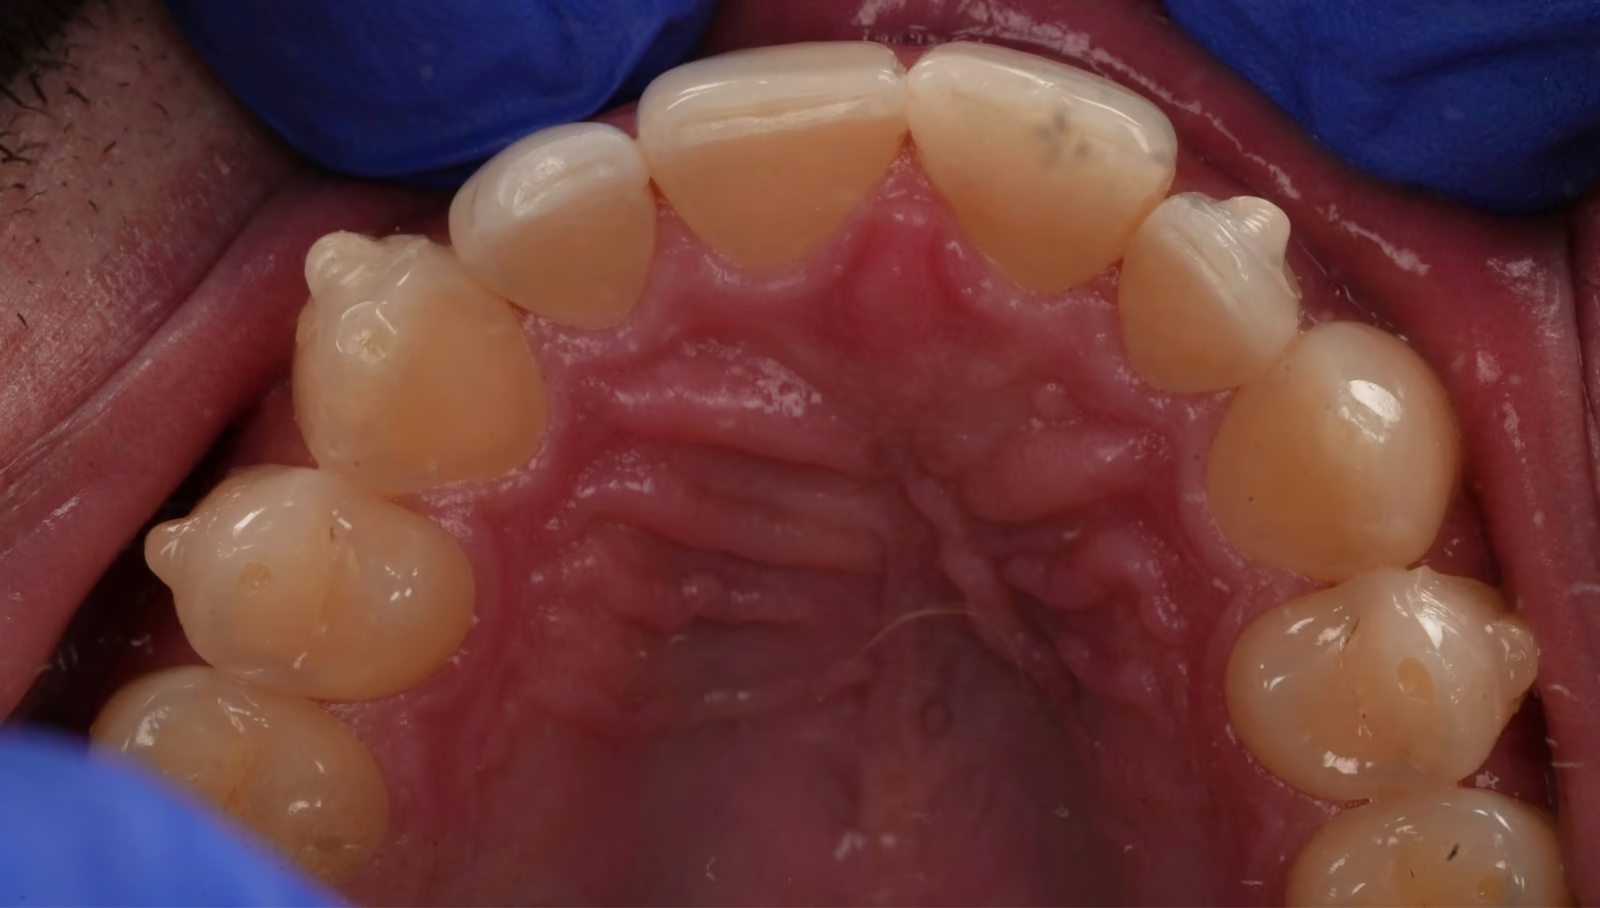
Movement continued as planned. It is worth saying that lateral incisors can be difficult teeth to move; they are small and rounded, and rotation of small, rounded teeth is among the less predictable aligner movements [3]. This is exactly why the attachments were placed. Gradual, steady movement was visible at each visit, the trays were engaging fully, all attachments were intact, and gum health and hygiene were well maintained.
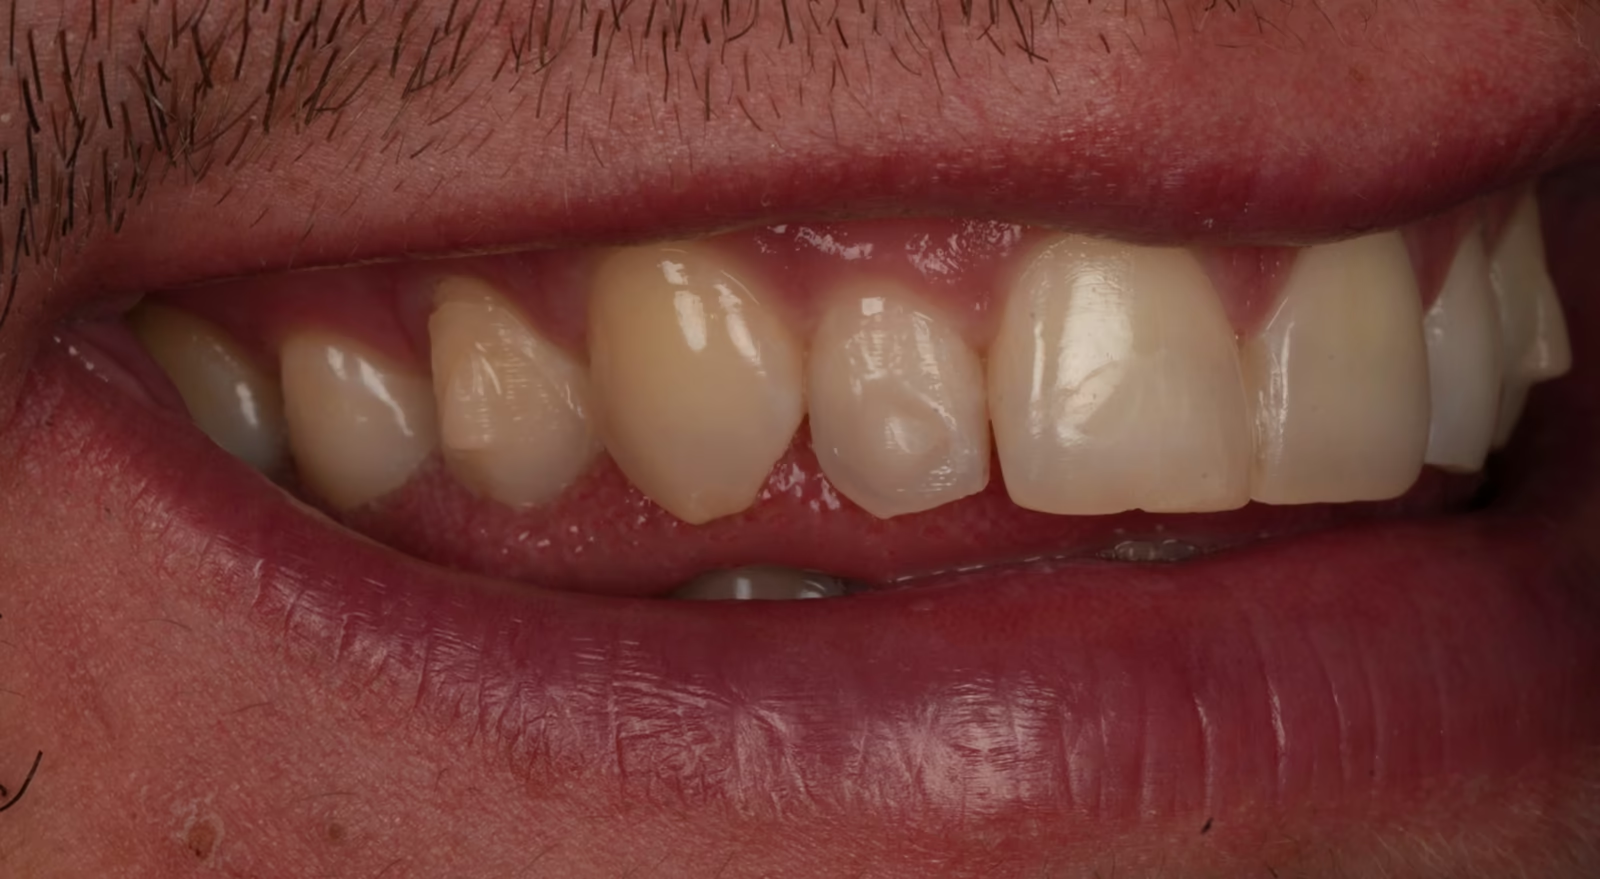
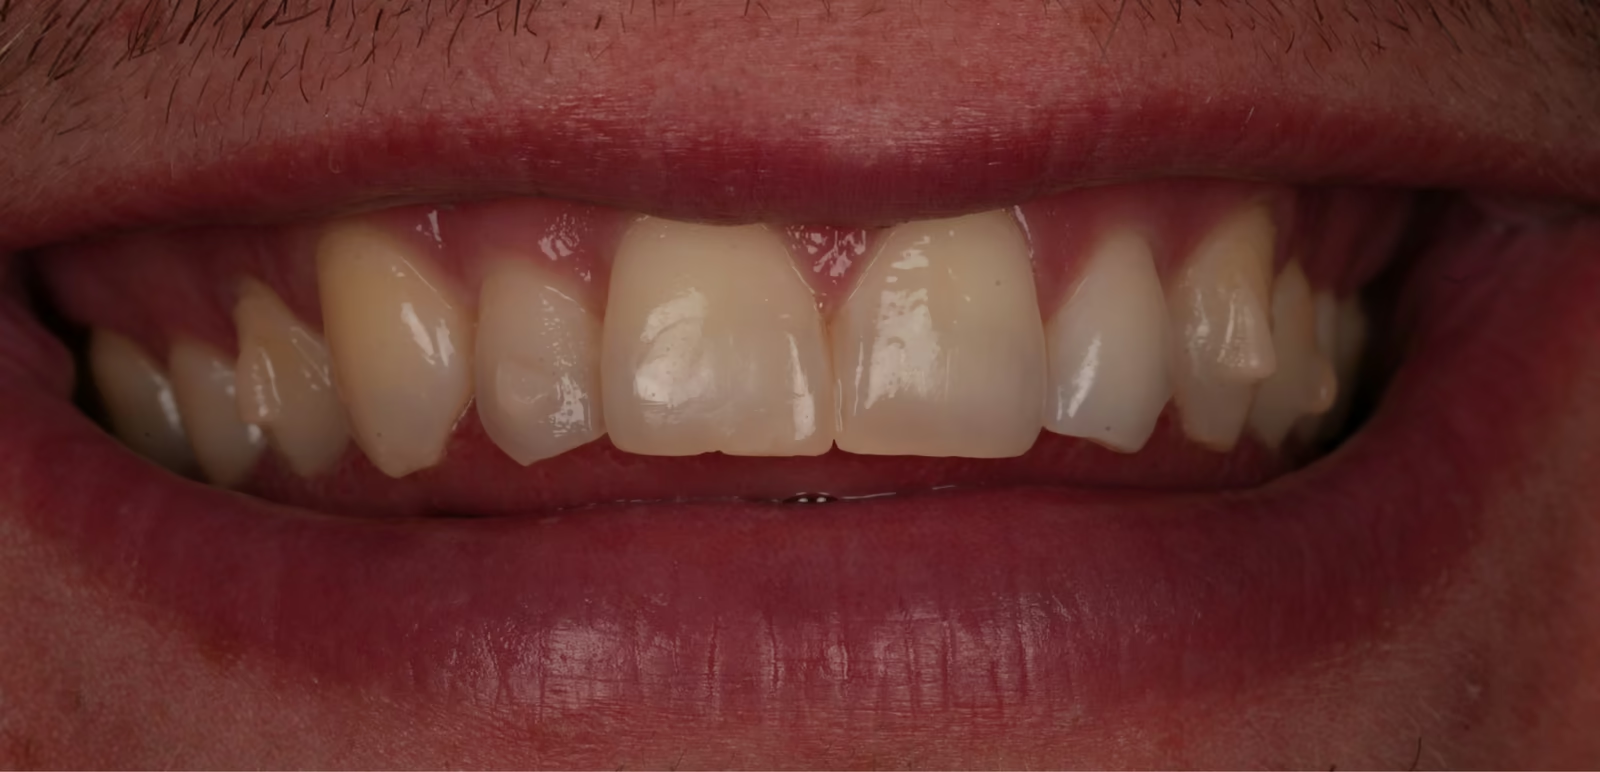
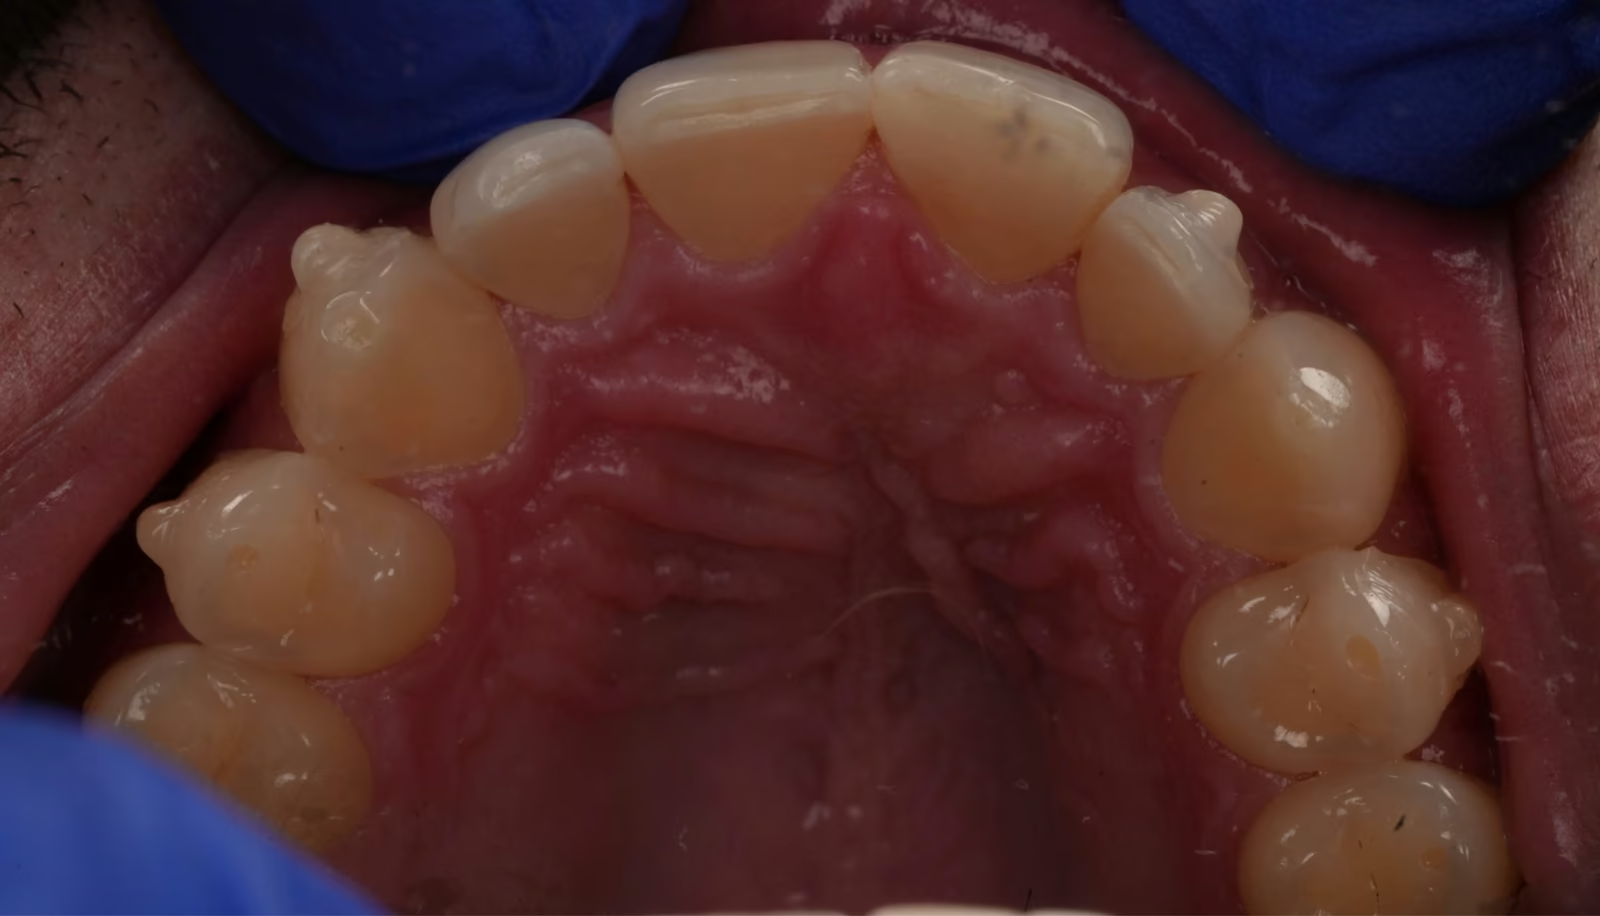
The remaining trays in the series were completed. Completing the trays, however, does not mean treatment is finished, this is the point where we re-evaluate against the original goals: Did the tooth reach its planned position? Is the bite balanced? Are there interferences left when the jaw slides?
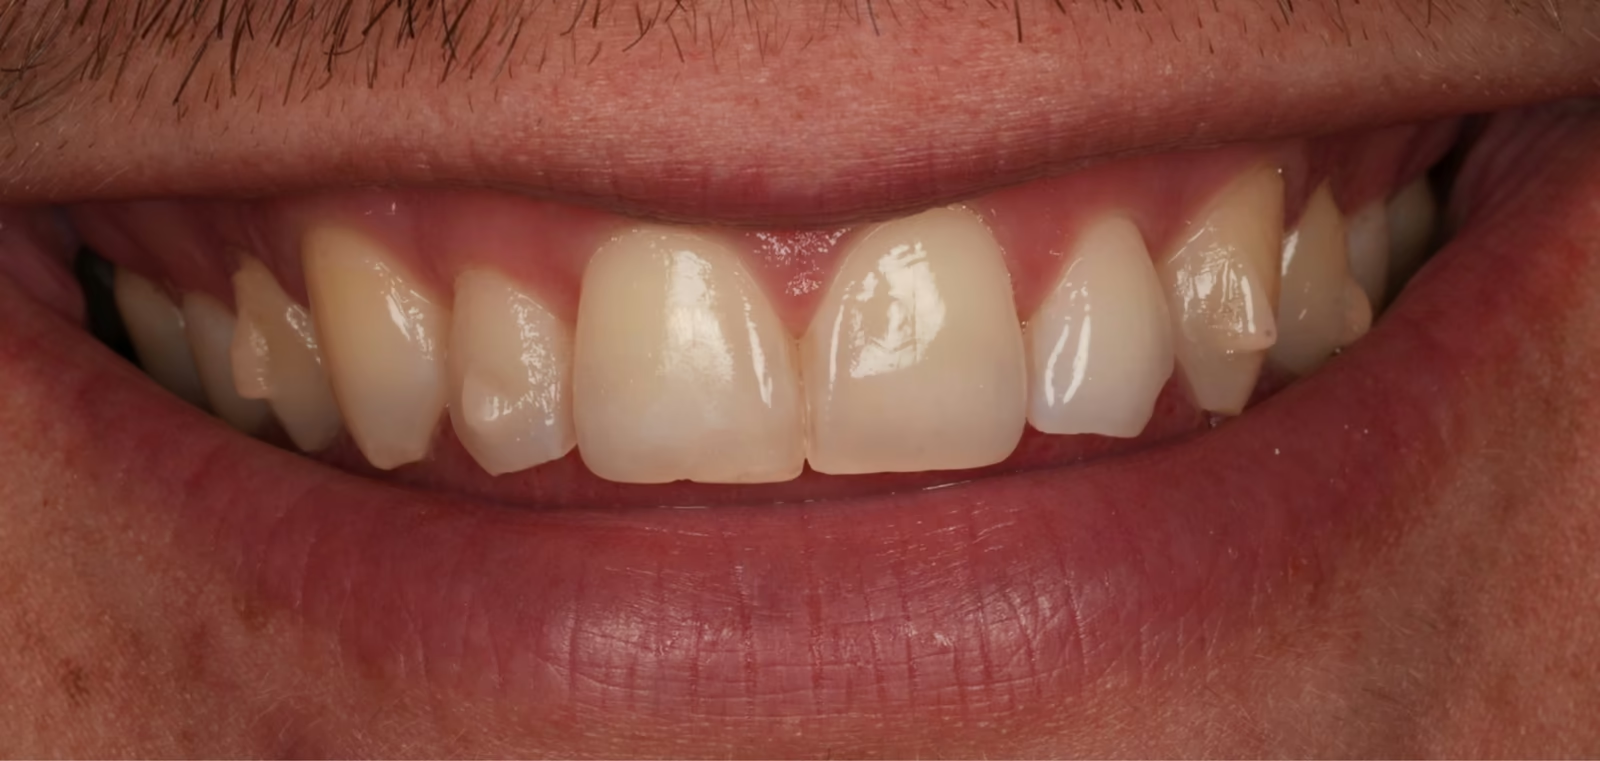
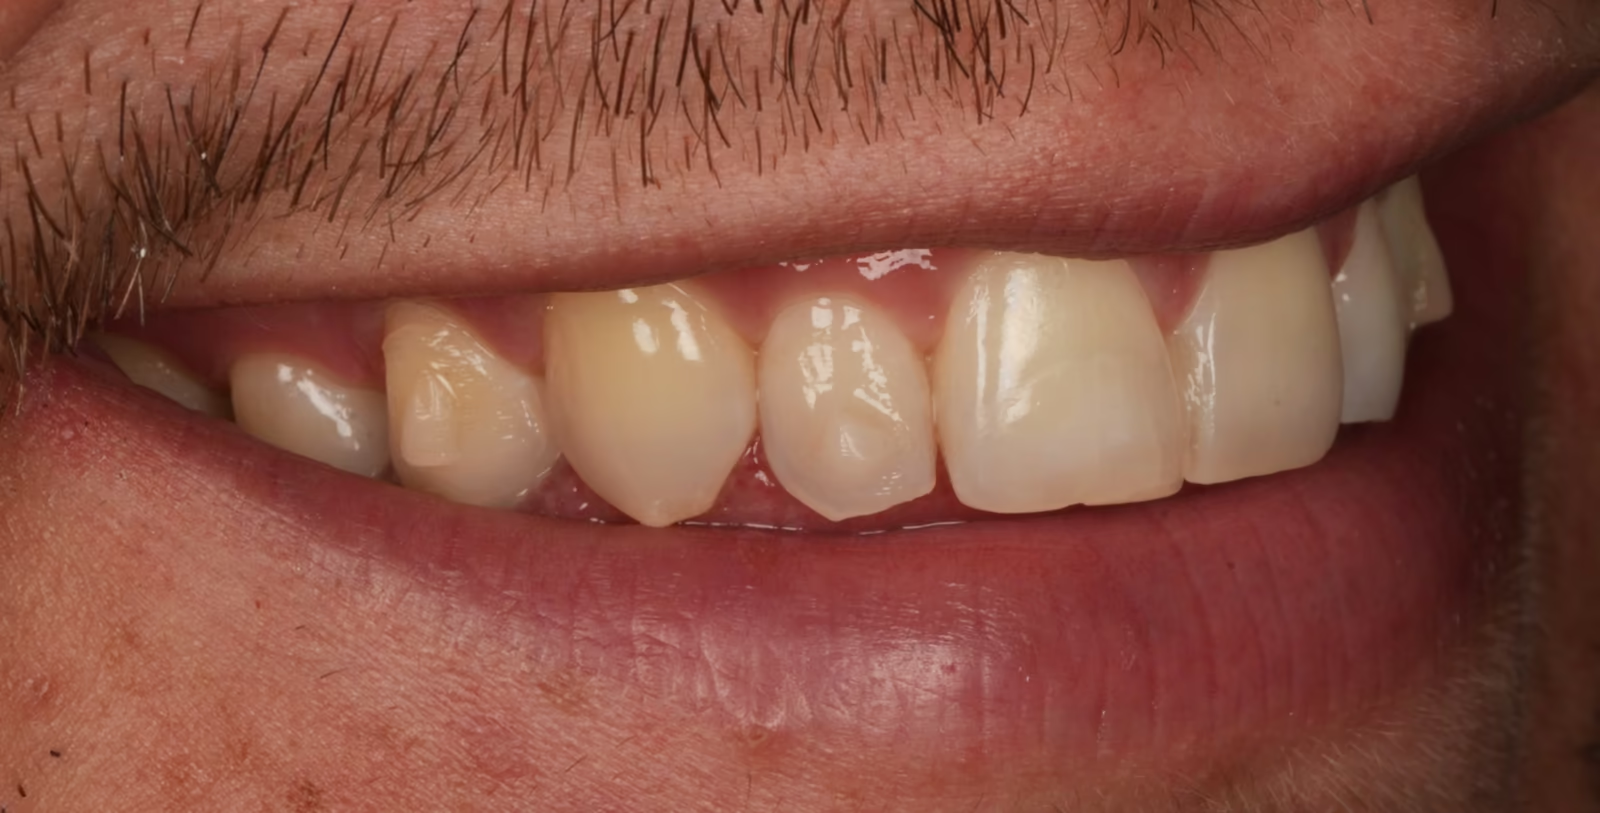
At re-evaluation, the primary goals had been achieved: the lateral incisors were aligned within the arch, and checking the bite confirmed no remaining interferences concentrated on the repositioned tooth — in side-to-side movements or in the way the front teeth guide the jaw.
Finishing then proceeded conservatively, in this order:
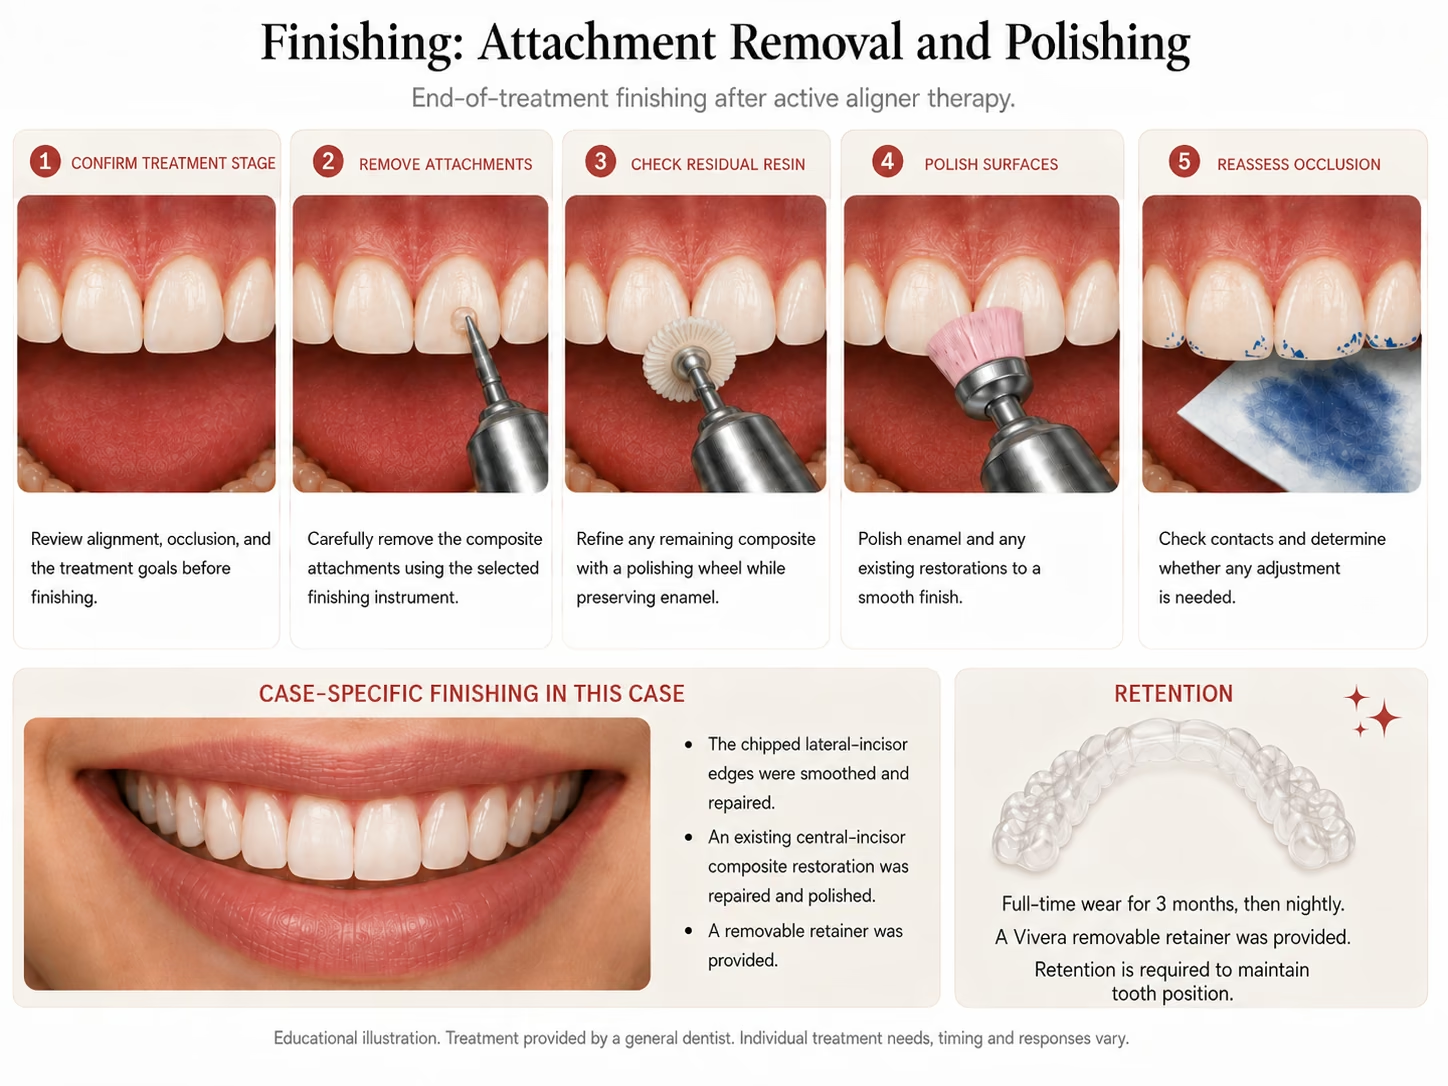
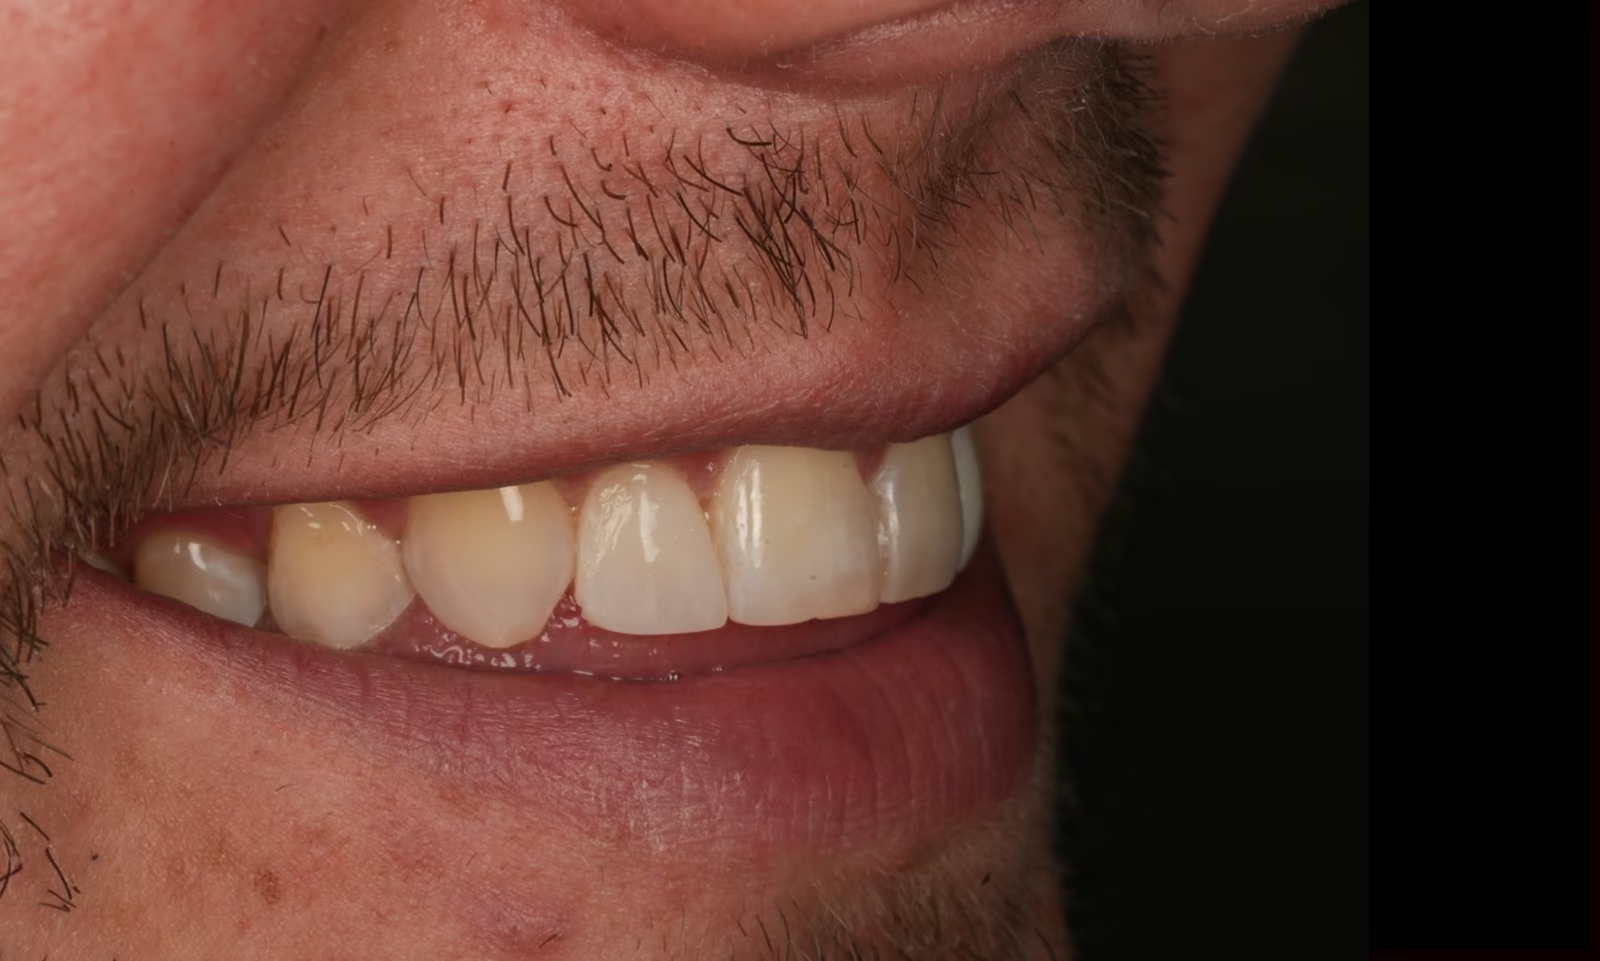
This patient had already lived the retention lesson once: earlier aligner movement, no retainers, and the teeth drifted back. Teeth have a natural tendency to move throughout life, alignment is not a one-time event that stays put on its own. A retainer protocol (removable trays worn nightly, a bonded wire, or a combination) is how the result is kept. One practical note we give every retainer patient: if a bonded retainer wire ever breaks, have it checked promptly.
No orthodontic treatment is risk-free, and expectations are part of the plan:
Will it hurt afterwards?
Some pain, tenderness and soreness of the teeth after starting Invisalign and when changing trays is normal; each tray is designed to fit snugly and apply light, controlled force over time; that force is what moves the teeth. The discomfort can be manageable with low doses of over-the-counter pain relief. In this case, the patient was advised to use the lowest effective dose of naproxen (Aleve) for one to two days after starting treatment. Whether an anti-inflammatory is suitable depends on your medical history and personal recommendation by your health provider.
You only showed the top teeth , what about the bottom?
In this case, treatment was limited to the upper arch, because that was where the chief complaint and the positional problems were. Single-arch treatment is appropriate in selected cases, but it is a deliberate decision, not a shortcut: both arches and the way they meet must be assessed first, because moving one arch changes how the teeth bite together. When lower alignment or the bite requires it, both arches are treated.
What are the bumps on my teeth?
Composite attachments: small, temporary bumps of tooth-coloured filling material that act as handles so the trays can grip, push and rotate teeth. Sometimes they are placed on teeth next to the one being moved, to serve as anchors. They are removed and polished off at the end of treatment. No drilling is involved.
Do I need a root canal before putting a crown on?
Not routinely, no. A root canal is needed when the nerve inside the tooth is irreversibly inflamed, infected or dead — not simply because a crown is planned or a tooth is moved. A healthy tooth can be crowned without one. In this case, neither was needed: after repositioning, the chipped tooth was managed with a small repair and polishing
Will my teeth look exactly like the 3D preview?
The preview is a plan, not a guarantee. Programmed movements tend to under-express or over promise, which is why plans build in overcorrection and why refinement scans and extra trays are a normal part of treatment [2,3]. In some cases the proposed plans are simply not attainable. This is why it is important for your dentist to assess the results.
What happens if I don't wear the trays enough?
Treatment doesn't just pause, the teeth and the trays fall out of sync. The fix is usually slowing the tray schedule or stepping back to the last well-fitting tray or restarting treatment. Consistent wear is one of the biggest factor in the success of Invisalign or clear aligner treatment.
How long do I have to wear the retainer?
In this case: full-time for three months, then nightly. Realistically, some form of retention continues for as long as you want the teeth to stay where they are — teeth move throughout life.
Will treatment pause if my gums bleed?
It can. Gum health and hygiene are checked at every visit, and treatment is paused if they slip, moving teeth through inflamed tissue is not something we do.
Sunny Dental Centre is a general dental practice. Dr. Mandip Puri, DDS, is registered with the Royal College of Dental Surgeons of Ontario as a general practitioner, not a specialist. Complex orthodontic problems may be best treated by an orthodontist, and we will tell you when we think that is the case. Individual results vary; what is achievable depends on your teeth, bite and goals. This case is not meant to provide a medical treatment advice, contact your dentist for individual advice.
Questions about clear aligner treatment? Sunny Dental Centre, Guelph — +1-519-824-8250.
7 Riverview Drive, Guelph, Ontario, N1E 3R6,
Canada
Mon: 10:00am - 7:00 pm
Tu/W: 8:00am - 5:00 pm
Thur: 9:00am - 4:00 pm
Fri - Sat 9:00 am - 3:00 pm (alternating)