Replacing a Front Tooth Crown with Recurrent Decay: A Case Study

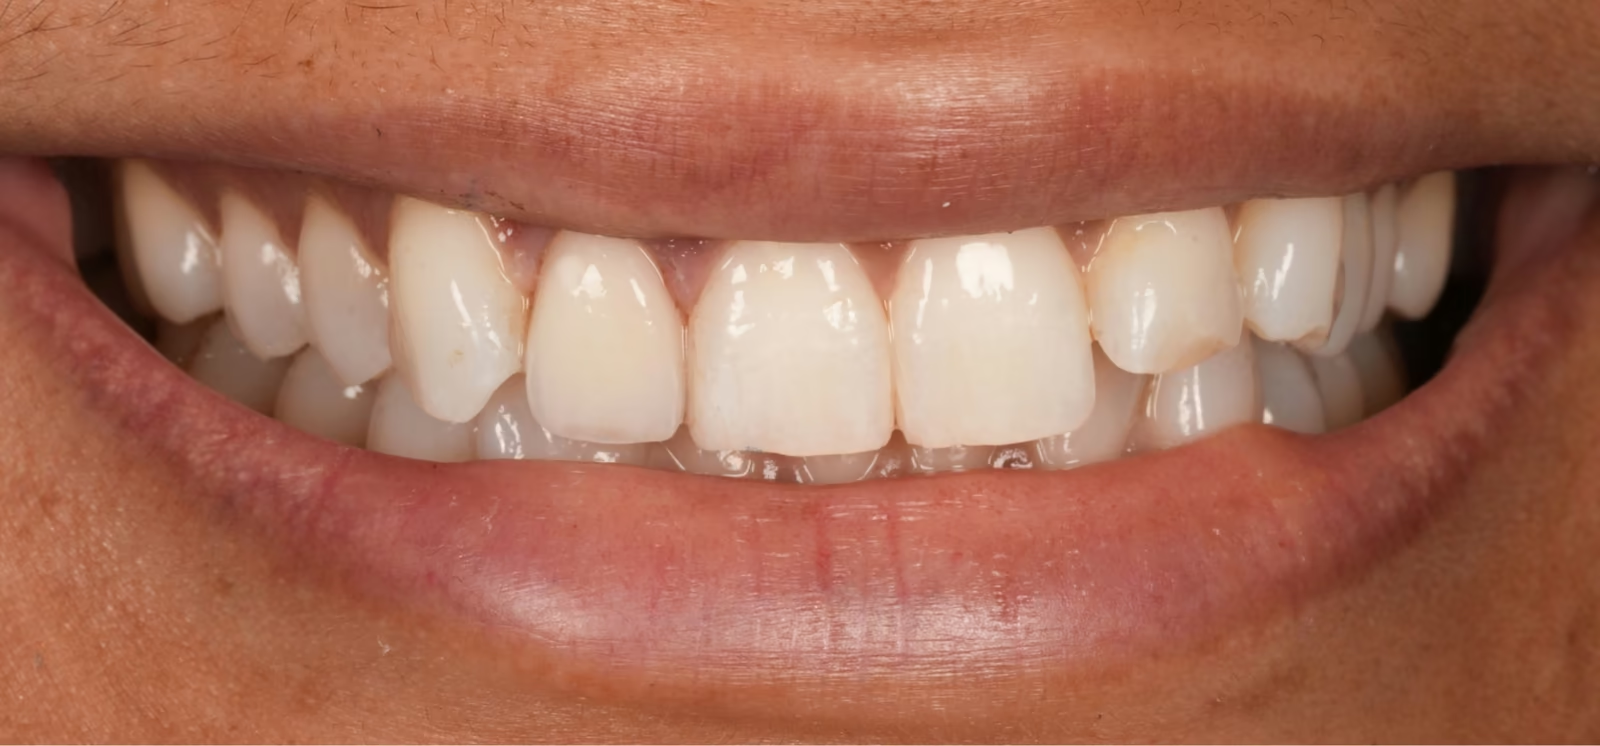
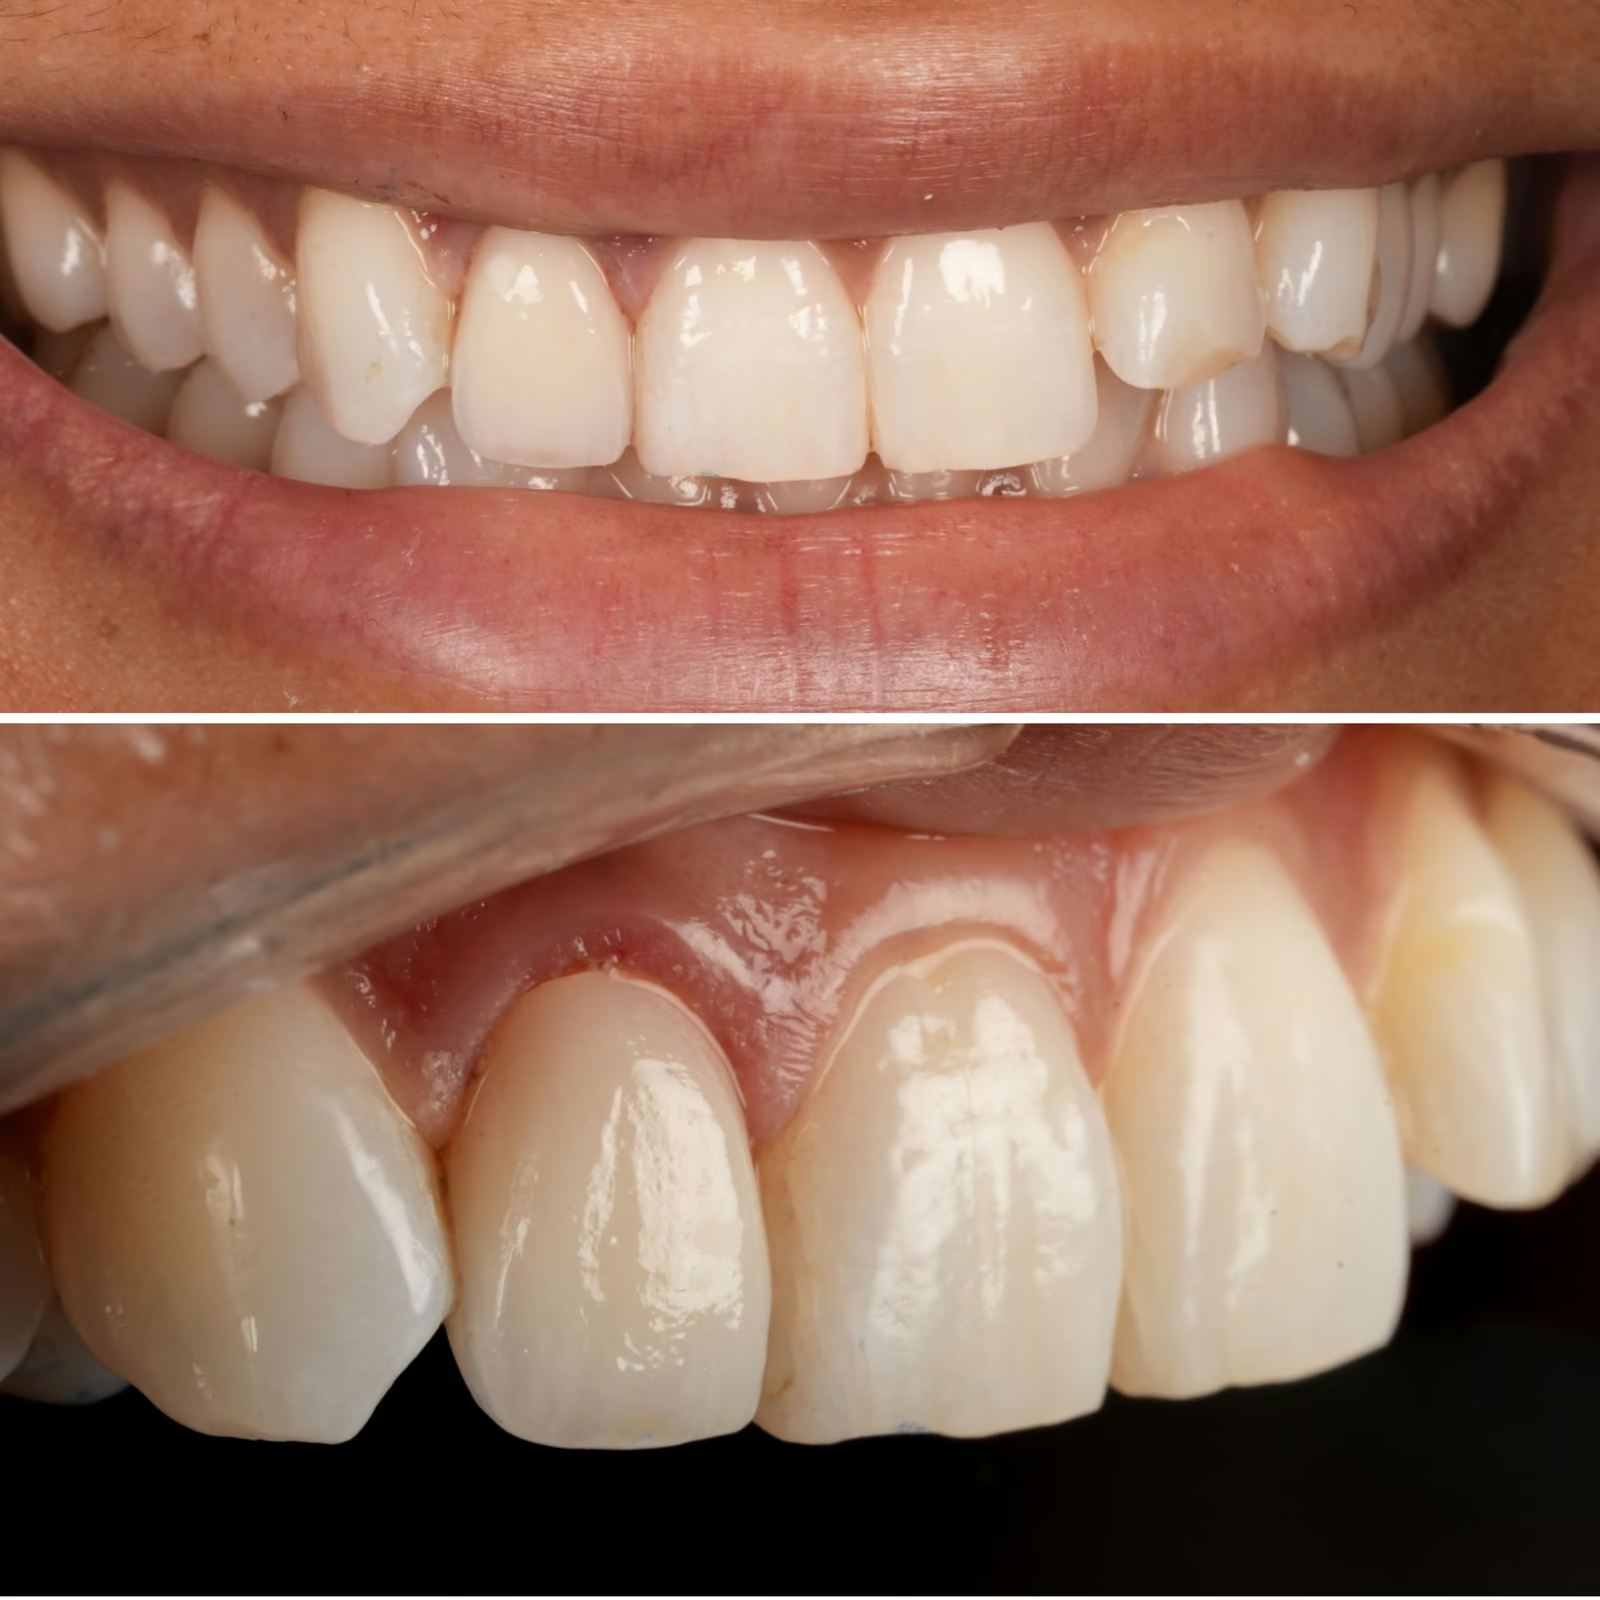
Close-up smile after replacement of a single front tooth crown, matched to the natural teeth.

Replacing a single upper lateral incisor crown at Sunny Dental Centre, Guelph

The short version. A front tooth crown placed more than twenty years earlier had developed decay beneath its margin and had broken down on the tongue side. It was replaced with a new crown shade-matched to the natural tooth beside it, and a night guard was made to protect it from the grinding that damaged the last one. Two visits. The full case, including how a single front crown gets colour-matched, once the most challenging components of a front tooth crown replacement is discussed step by step.

Can you tell which tooth is the crown?

Close-up smile photograph of the completed treatment, with a single lateral incisor crown matched to the natural teeth.
Figure 1 (real patient image): The finished result. One of these upper teeth is a laboratory-made crown,before reading on, see whether you can pick out which one. That it is hard to tell is precisely the goal of a single-crown match. Individual results vary.

Replacing a single crown in the visible smile is one of the more demanding procedures in restorative and cosmetic dentistry. The difficulty is not the crown itself, it is everything around it. A single new tooth has to sit beside natural teeth and match their colour, texture, shape, opacity and the way they handle light. When several teeth are restored together, they can be made to match each other. When only one is restored, it has to match teeth that nobody made.

The smile above is the finished result of this case. This case follows a maxillary lateral incisor, the smaller tooth beside the upper right central incisor. The previous crown had been in place for more than twenty years and had developed recurrent decay beneath its margin. What follows is how that crown was assessed, removed, and replaced with one matched to the natural tooth beside it.

The concern

The patient presented with recurrent decay below an existing crown. The crown was a porcelain-fused-to-metal restoration, placed over twenty years earlier.

It is worth giving the old crown its due. Two decades on, its colour, shape and form were still largely intact, a great result for a restoration of that age, quite frankly it could have been maintained for many more years. But looking closely, its limitations were visible: increased opacity, so that it read as flatter and more solid than the teeth around it; an inadequate shade match against the adjacent natural teeth; little surface texture, where natural enamel has fine horizontal ripples; and reduced translucency, particularly toward the biting edge, where natural teeth let light through.

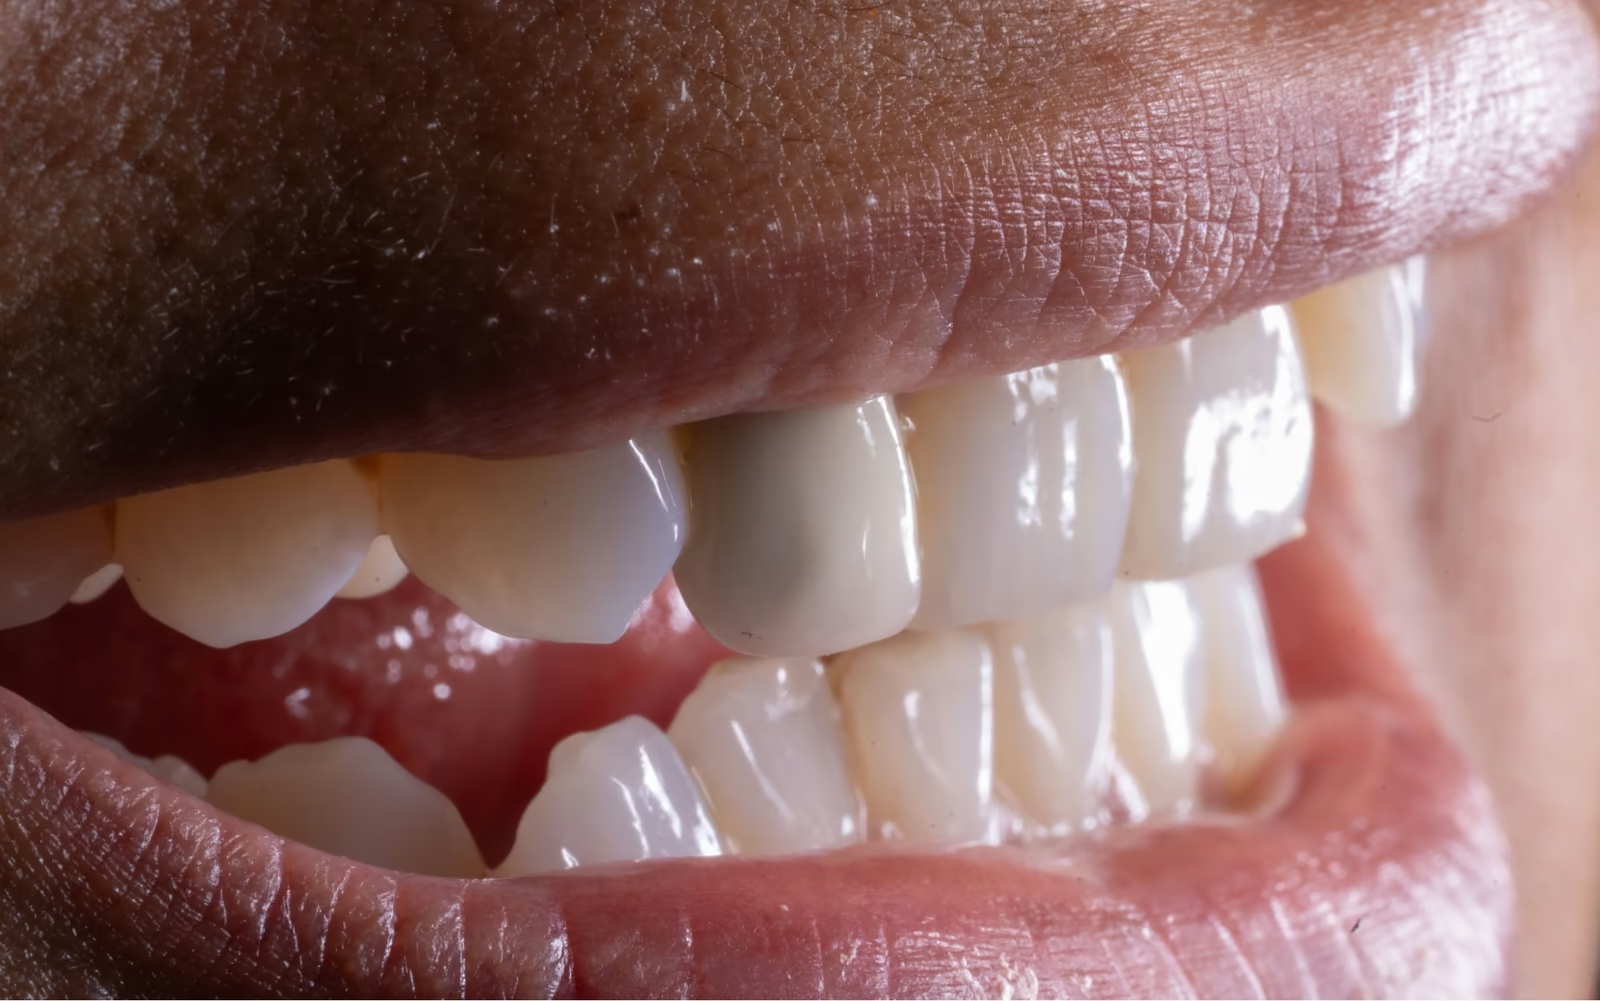
Side view of the upper front teeth showing the existing crown appearing more opaque and grey than the adjacent natural teeth.
Figure 2 (real patient image): Side view at presentation. From this angle the crowned lateral incisor reads as greyer and more opaque than its neighbours, and the biting edge lacks the translucency visible in the natural teeth.
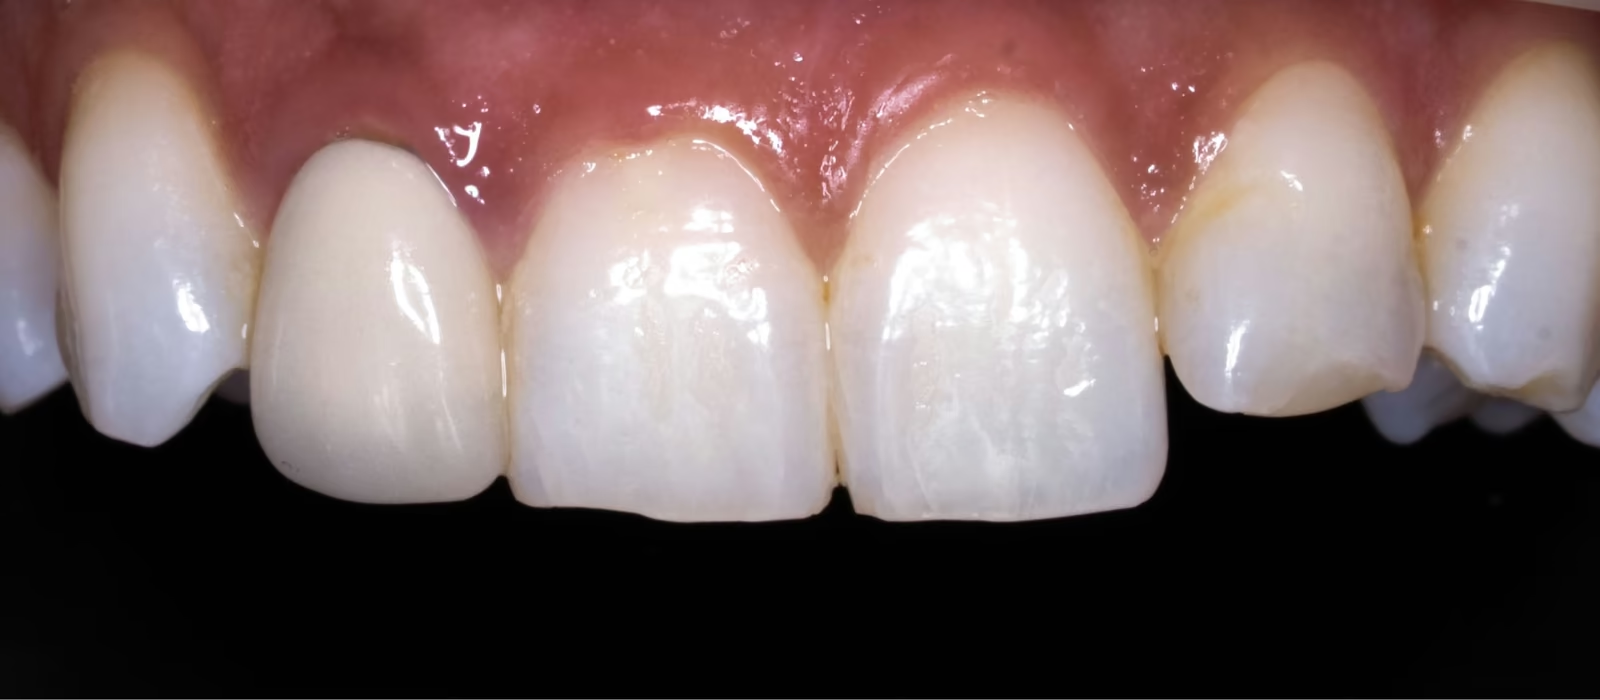
Retracted close-up photograph of the upper anterior teeth before crown replacement.
Figure 3 (real patient image): Retracted close-up of the upper front teeth before treatment, showing the difference in surface texture and light handling between the crown and the natural teeth beside it.

Why the crown was replaced

The appearance was not the reason for replacement. Had that been the only issue, the honest answer would have been that a twenty-year-old crown functioning well is not automatically a crown that needs replacing.

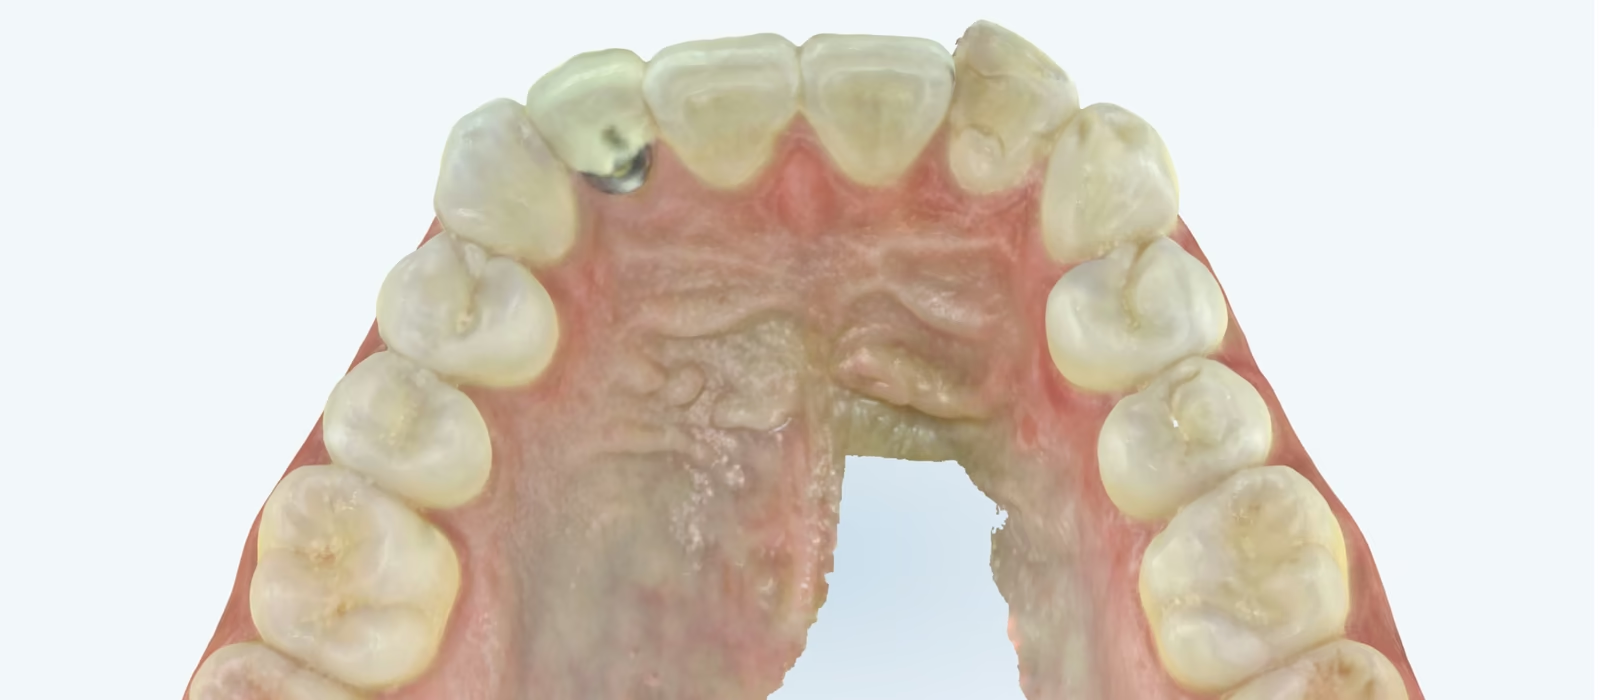
The reason was biological. Recurrent decay had developed along the crown margin, and the crown had broken down on the lingual side, the surface facing the tongue. That breakdown had been attributed to heavy wear and a history of clenching and grinding (bruxism).

Occlusal view of the upper dental arch showing wear and breakdown on the tongue-facing surface of the crowned lateral incisor.
Figure 4: Occlusal view of the upper arch, showing breakdown of the crown on the lingual surface. Wear patterns of this kind are consistent with the reported history of clenching and grinding.

How long do crowns last?

Crowns generally have a good long-term prognosis, and it is worth being specific rather than vague about that. A systematic review of tooth-supported single crowns estimated a five-year survival of about 94.7% for metal-ceramic crowns, with most all-ceramic types performing similarly — roughly 92% to 97% depending on the material [1]. Those are five-year figures from pooled studies; individual outcomes vary with the tooth, the bite, oral hygiene and habits such as grinding. Clinically, we routinely see crowns last over 15+ years.

This crown had served for more than twenty years and if not for the decay could have lasted longer. Restorations do not last forever, and the usual reason they are eventually replaced is not that they wear out cosmetically — it is decay at the margin. Thankfully, this can be prevented with good oral hygiene techniques.

Why decay forms at the margin, not on the crown

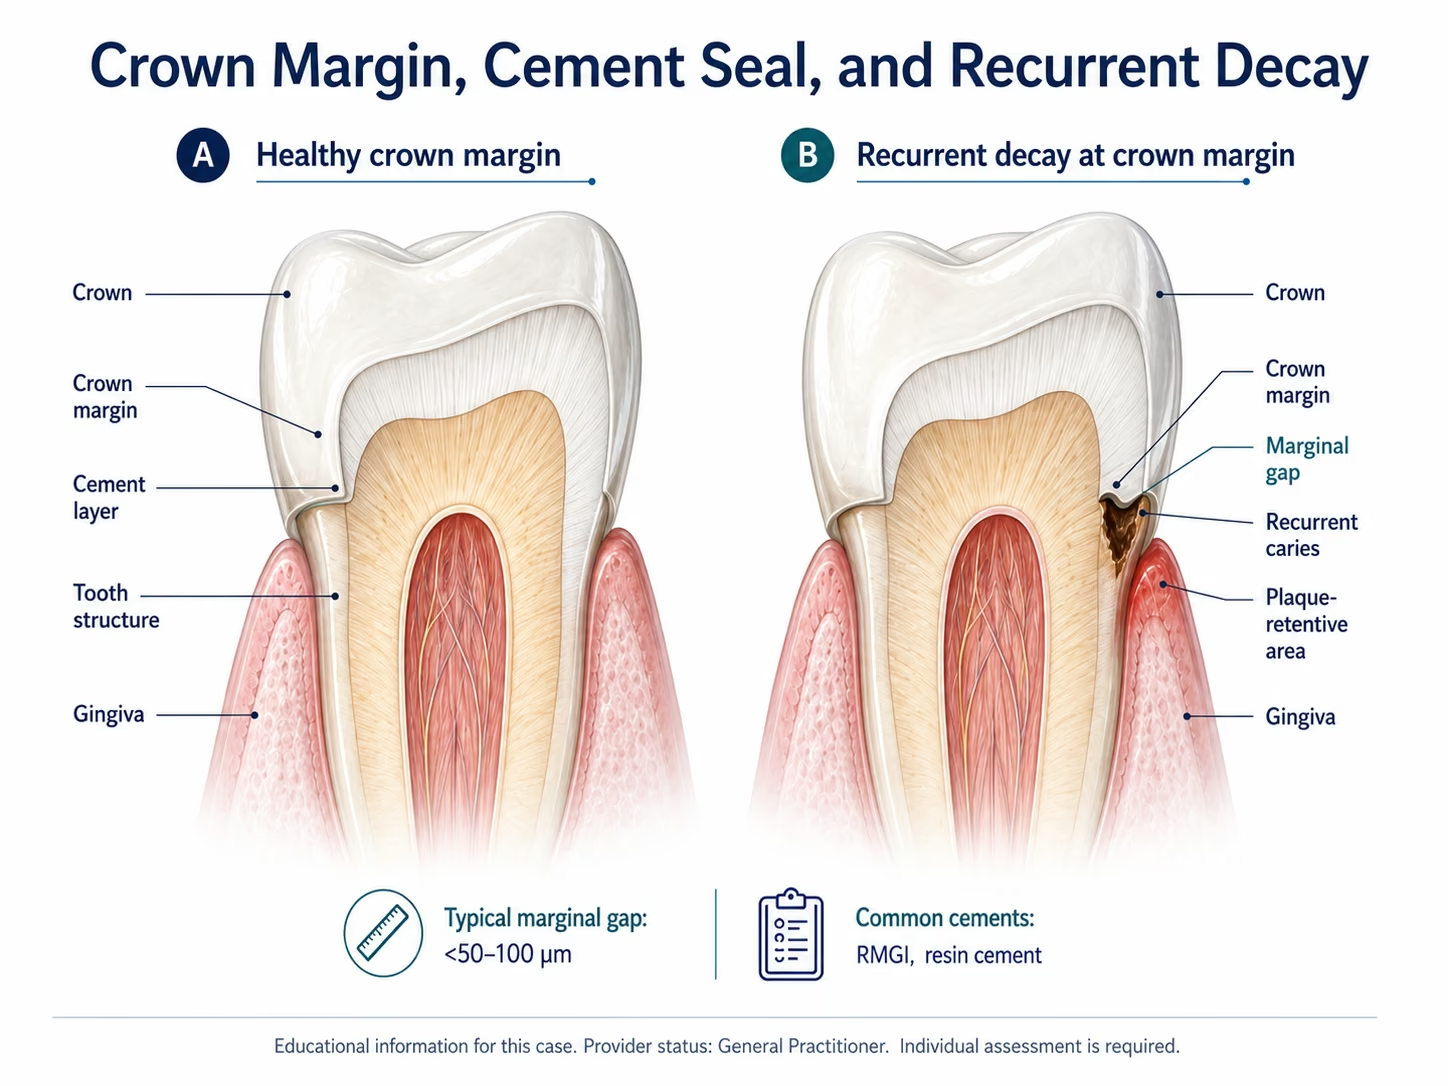
The crown material itself cannot decay. Zirconia, porcelain and metal are not biological tissue, and bacteria cannot dissolve them. What can decay is the natural tooth, and the vulnerable place is the margin, the boundary where the crown ends and the natural tooth begins.

That boundary is never a perfect seal. In a well-fitting crown the gap is on the order of 50 to 100 micrometres, which is 0.05 to 0.1 mm — thinner than a sheet of paper, but not nothing. That space is filled with dental cement, and the cement is what keeps bacteria out. Over years, if cement washes out, if the margin is stressed by heavy forces, or if plaque sits along the gumline, decay can begin at that junction and travel underneath.

Several cement types are available, and the choice matters. Resin-modified glass ionomer and resin cements are both common. One practical consideration guided the choice here: this crown's margin was not supra-gingival, it sat at or below the gumline rather than clearly above it. Resin cement is technique-sensitive to clean up in that position, and residual cement left below the gumline is a known cause of tissue inflammation and, around implants in particular, bone loss. A resin-modified glass ionomer cement was used for that reason.

Cross-section diagram of a crowned tooth showing the crown margin, the cement layer, and the point where recurrent decay develops in the natural tooth.
Figure 5: The margin is the boundary where the crown meets natural tooth. The gap between them is typically 50–100 micrometres (0.05–0.1 mm) and is filled with cement. Decay begins in the natural tooth at this junction, not in the crown material.

Assessing how deep the decay went

When decay is found below a crown, the first question is how deep it goes  and that question is genuinely difficult to answer before the crown comes off.

Radiographs help less than patients expect here. The crown is radiopaque: it blocks X-rays, and that opacity obscures the tooth structure directly beneath it. So a radiograph can suggest a problem but rarely defines its full extent under a crown.

The assessment therefore ran in two stages. Before crown removal: a radiograph, testing of the nerve's vitality, percussion (tapping the tooth) and palpation of the surrounding tissue. After crown removal: direct visual inspection and gentle probing with an explorer, a thin-ended instrument used to feel the decay's depth and texture.

The findings: the decay had penetrated below the crown but was within 1 to 2 mm — within the dentin, not deep, and not into the pulp. The nerve was not involved, and testing confirmed it was vital.

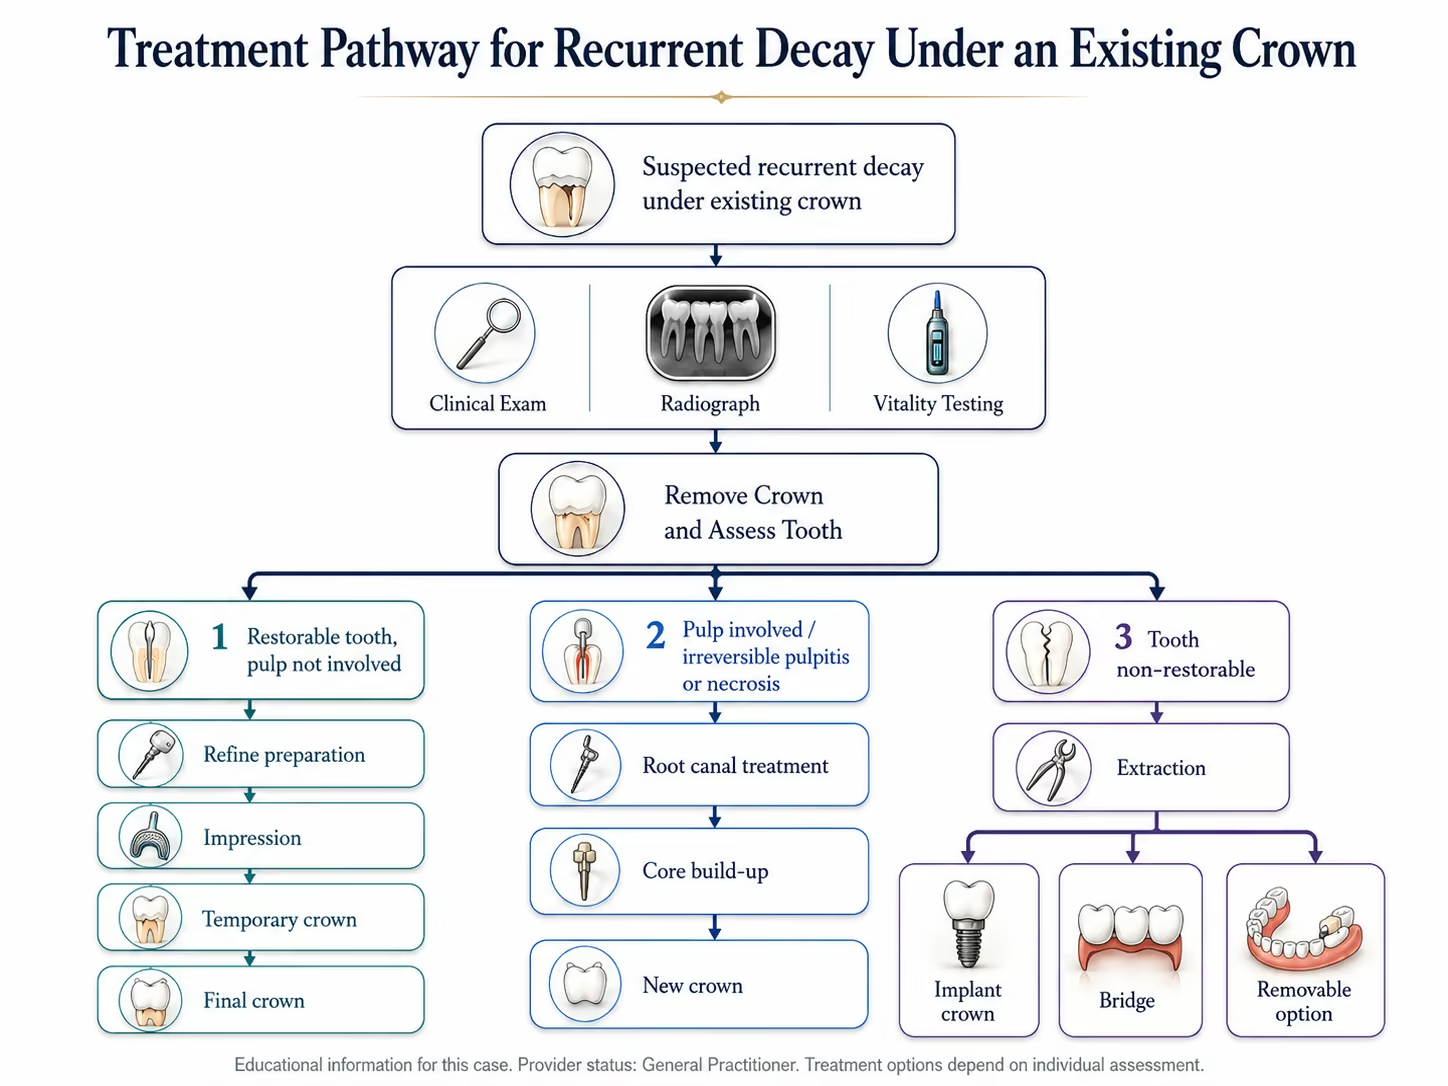
That finding decided the treatment. If the tooth is restorable and the decay does not involve the nerve, a straightforward crown replacement can proceed. If decay reaches the pulp, or the pulp is irreversibly inflamed or dead, the options change; root canal treatment before the new crown, or, where too little sound tooth remains, extraction and a discussion about replacement.

Decision diagram showing assessment steps for decay under an existing crown and the three resulting treatment pathways.
Figure 6: The assessment sequence and the three pathways it leads to: crown replacement alone where the pulp is healthy, root canal treatment first where the pulp is involved, and extraction with a replacement discussion where the tooth cannot be restored. Note additional options are available but not reviewed here, this is case specific.
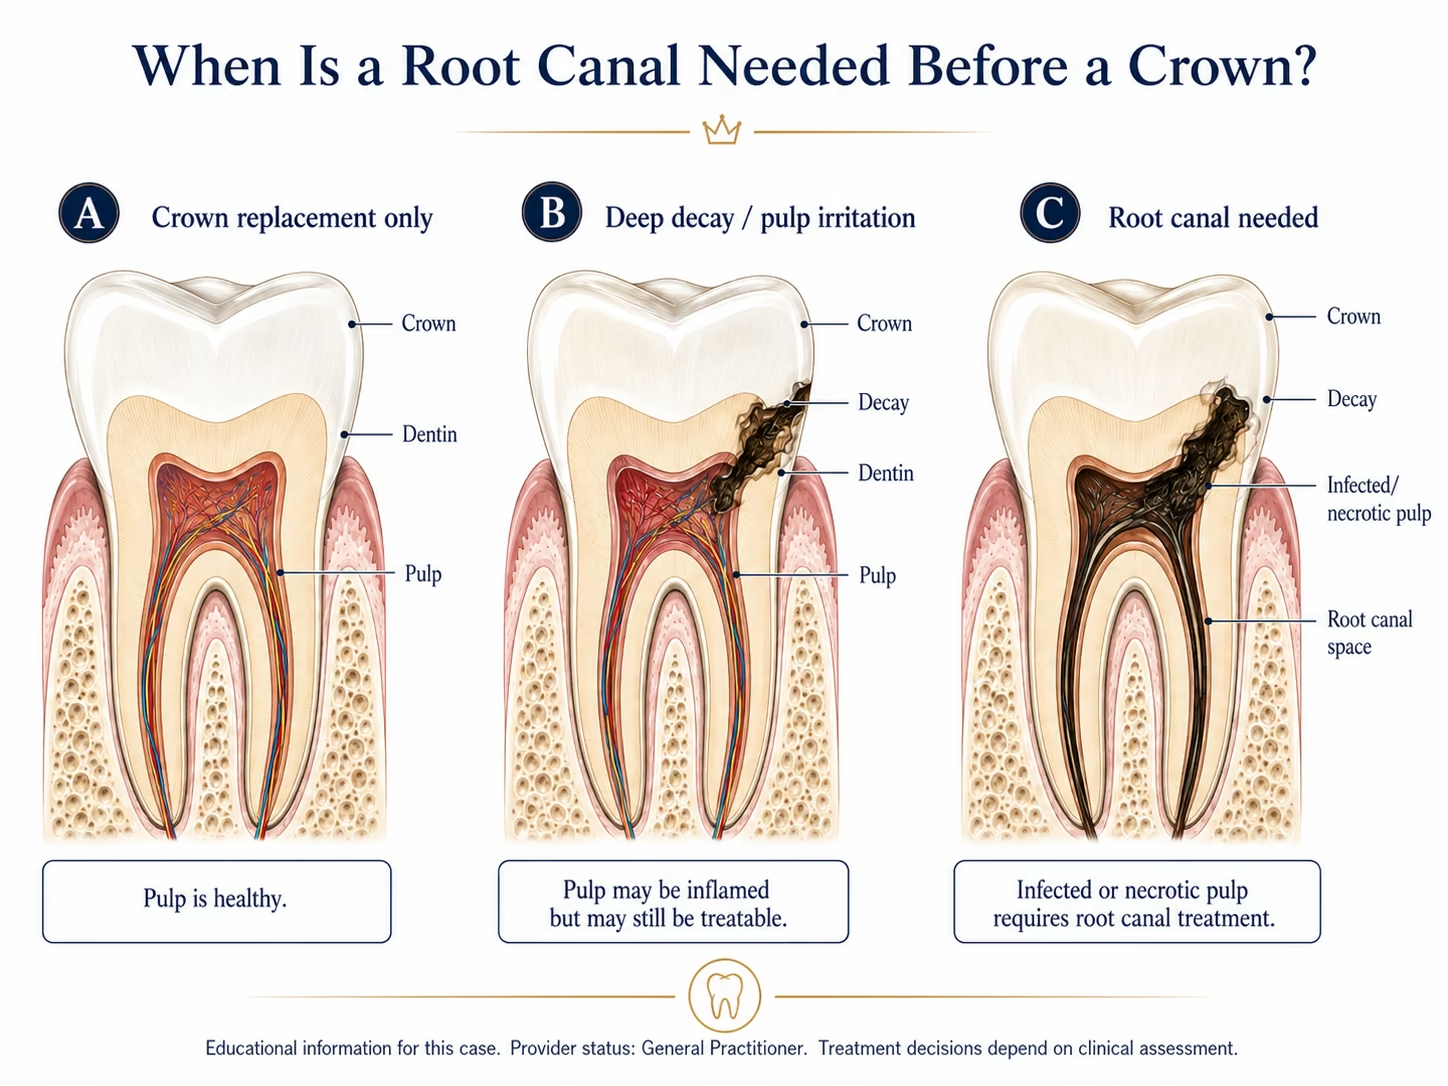
Diagram comparing three scenarios for whether a root canal is needed before a crown: healthy pulp, treatable pulp irritation, and infected or necrotic pulp.
Figure 7: When a root canal is needed before a crown depends on the pulp, not the crown. A healthy pulp allows crown replacement alone; deep decay or irreversible inflammation calls for root canal treatment first. In this case the pulp tested healthy.

An Analogy - Think of a Helmet

There are many misconceptions about crowns. At our office I like to use the analogy of a helmet. In many cases the purpose of the crown is to cover, protect and/or restore a tooth. Tooth removal occurs primarily to create space and for retention.

Removing the old crown

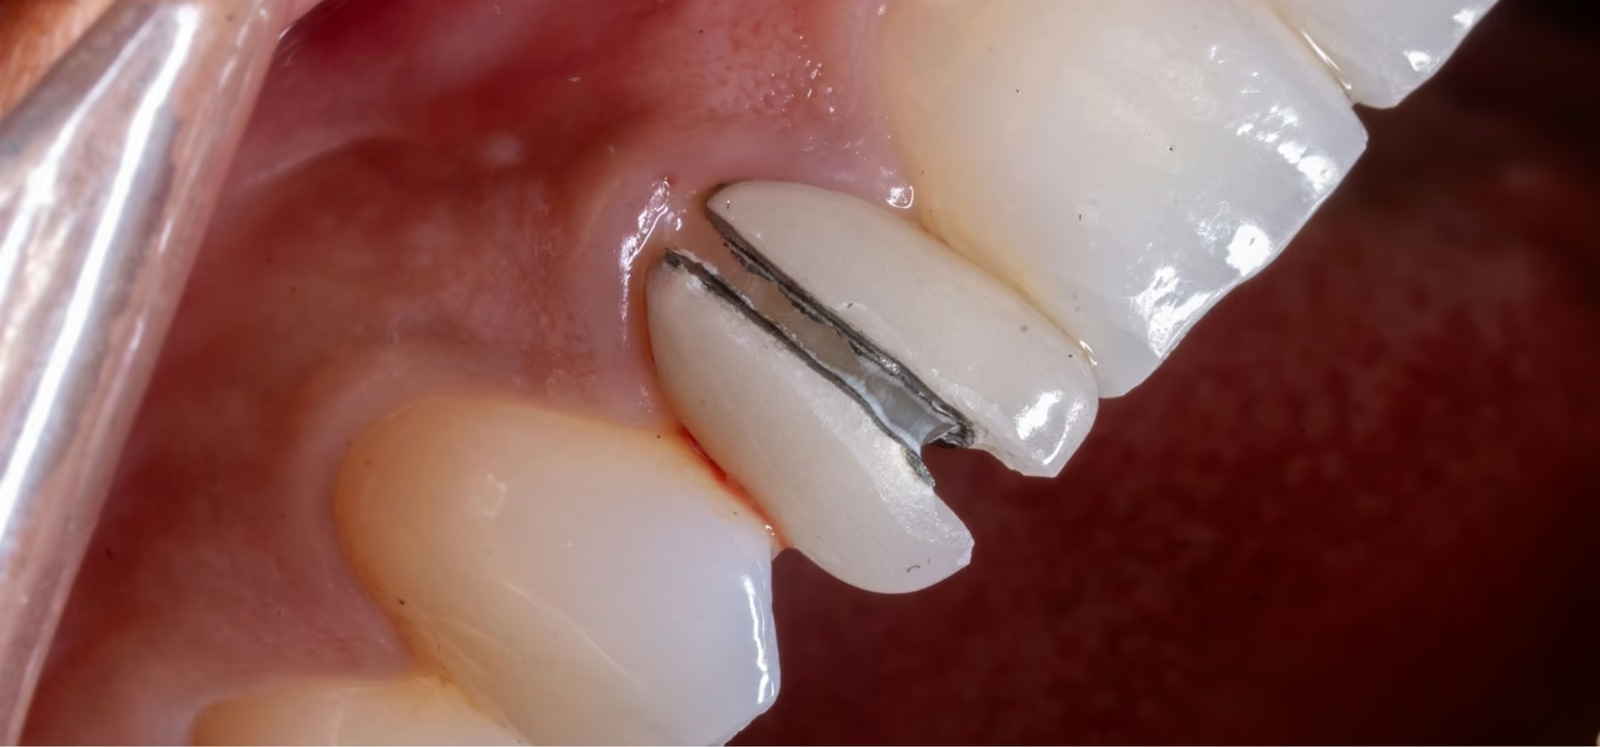
Close-up of the existing crown sectioned during removal, showing the metal substructure beneath the porcelain layers.
Figure 8 (real patient image): The crown sectioned during removal. Three layers are visible, including the metal substructure — confirming this was a porcelain-fused-to-metal crown rather than an all-ceramic one. Sectioning is done under magnification so that no additional natural tooth is removed.

Crowns vary in what they are made of, and you often cannot be certain until one comes off. All-ceramic crowns — zirconia and lithium disilicate among the most common. These contain no metal at all. Porcelain-fused-to-metal crowns have a metal coping beneath the porcelain, and that metal can show as a dark or greyish line at the gumline as tissue recedes over the years, which is one of the reasons all-ceramic restorations have become more common.

Sectioning this crown under magnification confirmed the metal core. The crown was cut, gently separated and lifted off, with care taken not to remove any additional natural tooth in the process. This is the most predictable and gentle method of teeth removal in this case.

Preparing the tooth

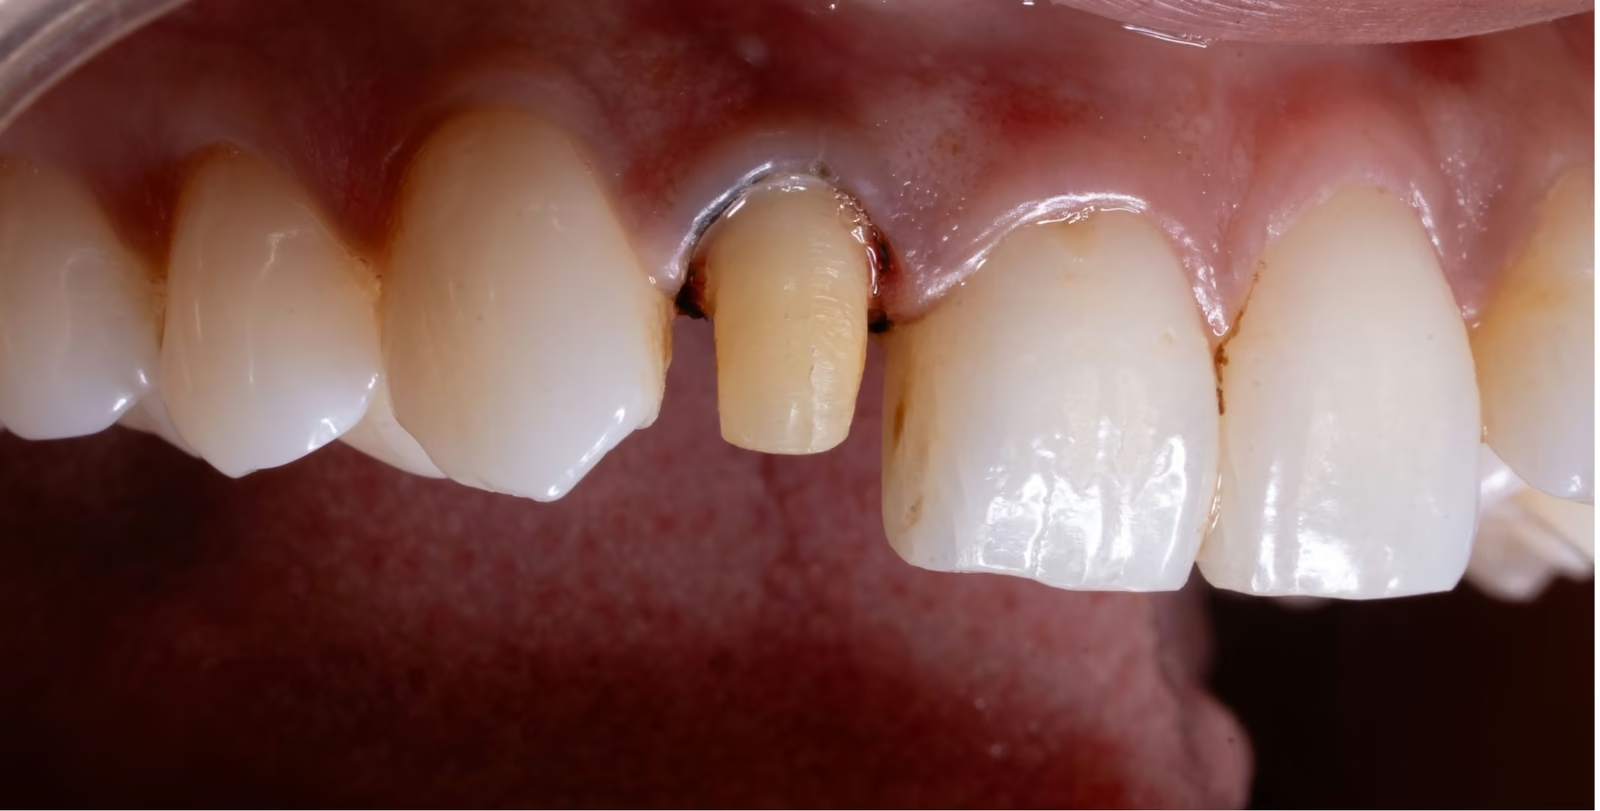
The prepared lateral incisor after removal of the old crown, showing the darker underlying tooth structure.
Figure 9(real patient image): The tooth after crown removal and refinement of the preparation. Note the darker, warmer colour of the underlying tooth, the stump shade, which influenced the choice of material for the new crown.

With the crown off, the preparation was refined according to standard principles of tooth preparation. Minimal additional tooth was removed, and the site of decay was incorporated into the preparation; meaning the decayed area was cleaned out and became part of the shape the new crown would fit over, rather than requiring separate treatment. This saved the individual the cost of an additional procedure otherwise known as a "core buildup"

One detail in this photograph matters more than it first appears: the colour of the prepared tooth. It is darker and warmer than a freshly prepared, untouched tooth would be. That underlying colour is called the stump shade, and it shows through a translucent crown the way a coloured wall shows through thin paint. It drove the material choice later in this case.

The digital scan

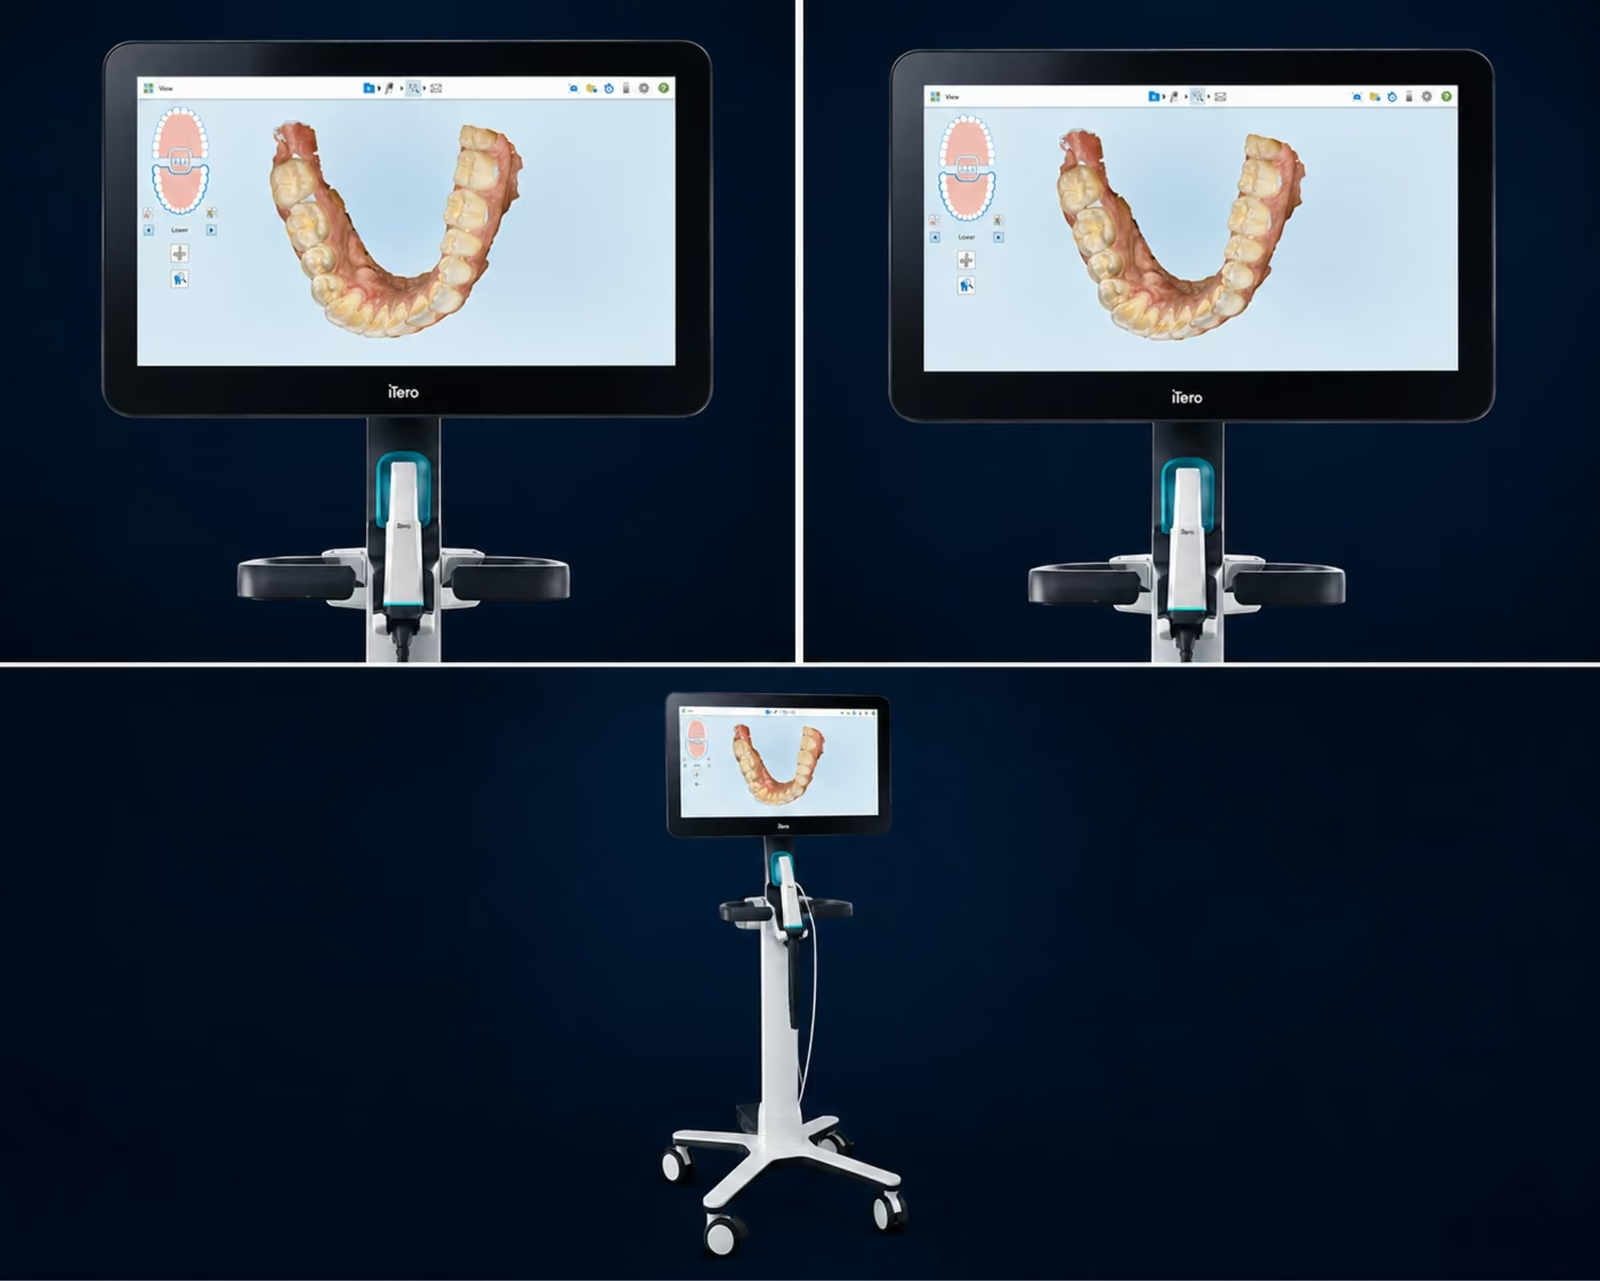
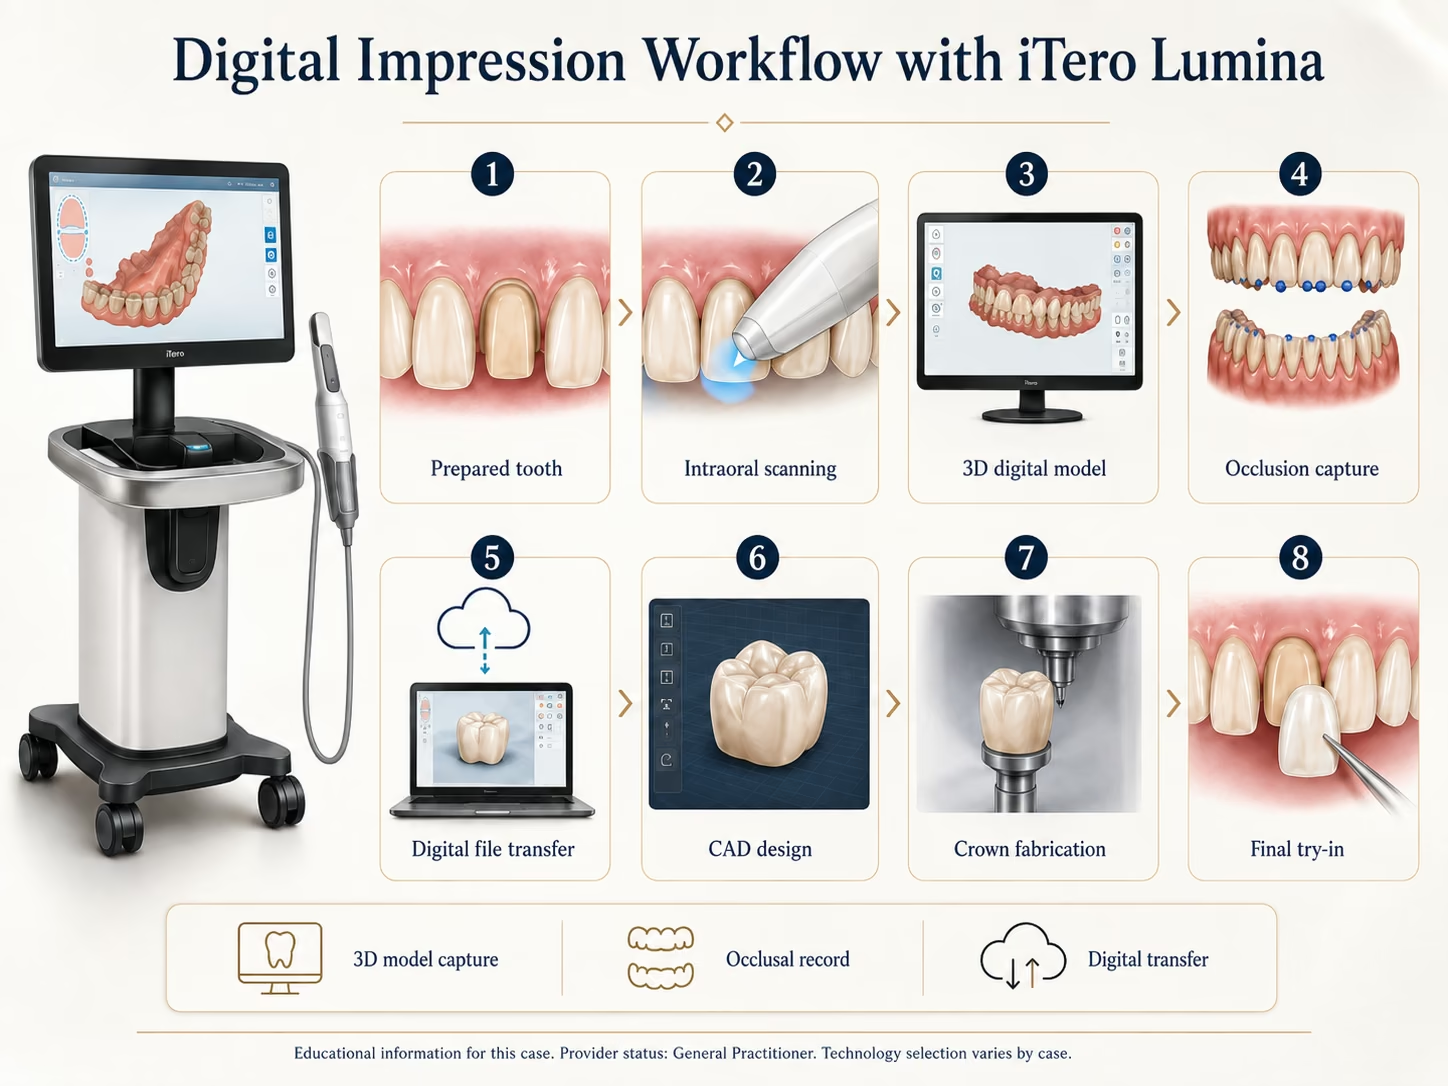
Once the preparation was complete, a mould of it was taken so the new crown could be fabricated. This can be done conventionally, with impression material, or digitally. Our office uses an iTero Lumina digital scanner. It captures the preparation and the way the teeth meet, and builds a three-dimensional model that the laboratory works from. A temporary crown was fabricated and cemented with a temporary bonding agent to protect the tooth while the final crown was made.

iTero intraoral scanner displaying a three-dimensional digital model of a dental arch.
Figure 10: The intraoral scanner used to capture the preparation and the bite. The scan produces the three-dimensional model the laboratory uses to design and fabricate the crown.
Diagram of the digital impression workflow: prepared tooth, intraoral scanning, three-dimensional model, occlusion capture, digital transfer, CAD design, crown fabrication and try-in.
Figure 11: The digital impression workflow, step by step: the prepared tooth is scanned, a three-dimensional model and the bite are captured, and the file is sent to the laboratory for design and fabrication.

Shade matching a single tooth - The challenge

Of everything in this case, shade matching was the most demanding step, and it is worth explaining why. Teeth are not one colour. A single natural tooth carries luminosity, fluorescence, translucency, surface texture, internal characteristics and colour that shifts from the gumline to the biting edge. Reproducing that in a laboratory-made crown is difficult. Reproducing it so that it matches one specific neighbouring tooth is harder still.

There is also a decision about which tooth to match. In this case the reference was the central incisor, the large front tooth — rather than the canine. That choice matters: canines are typically more saturated and yellower than central incisors, so matching to the wrong reference produces a crown that is technically well-made and visibly darker.

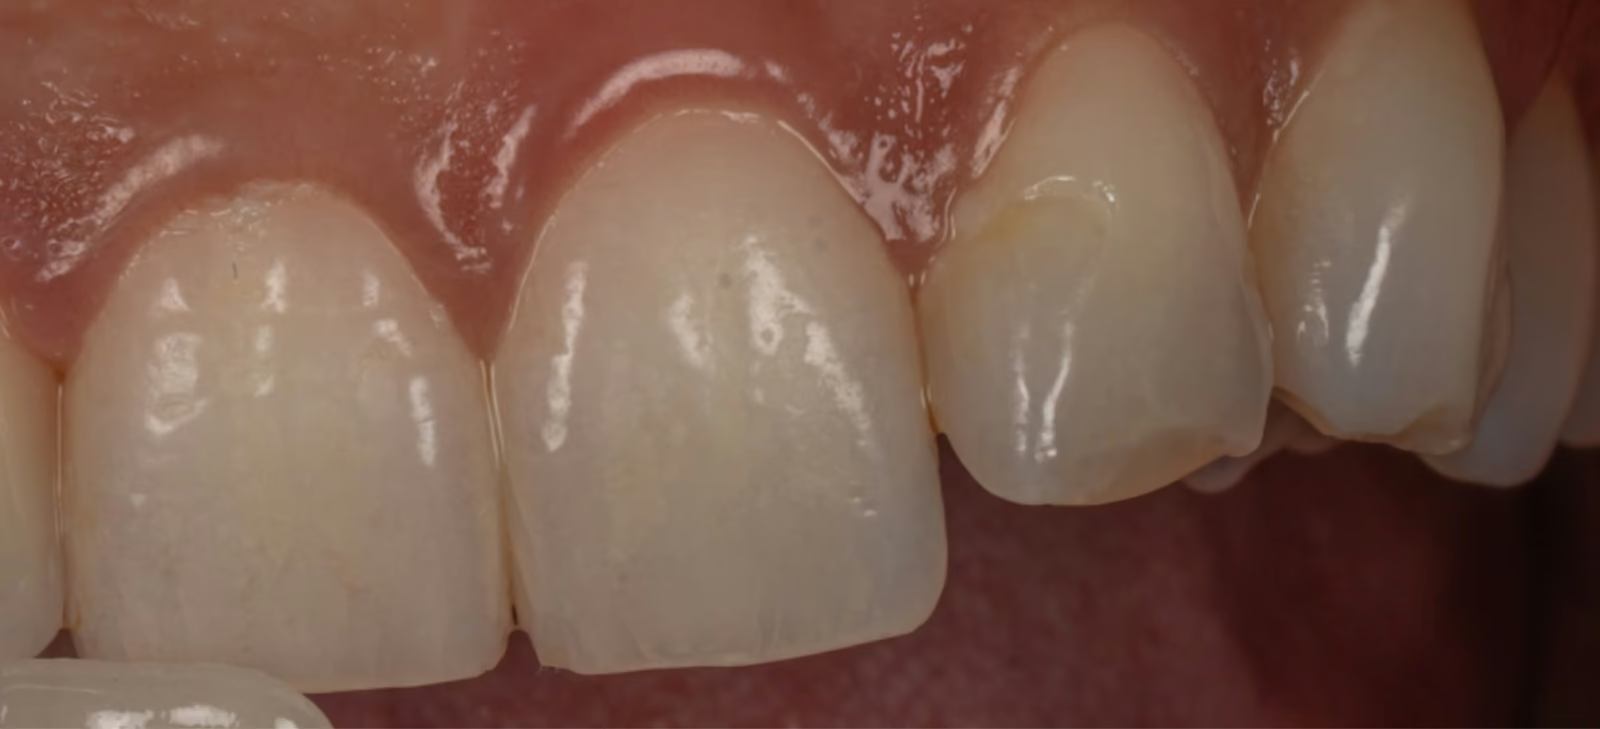
Retracted close-up of the natural upper front teeth used as the colour reference for the new crown.
Figure 12 (real patient image): Retracted view of the teeth used as the shade reference. Translucency along the outer edges, surface texture, and warmth toward the gumline all had to be reproduced in the new crown.
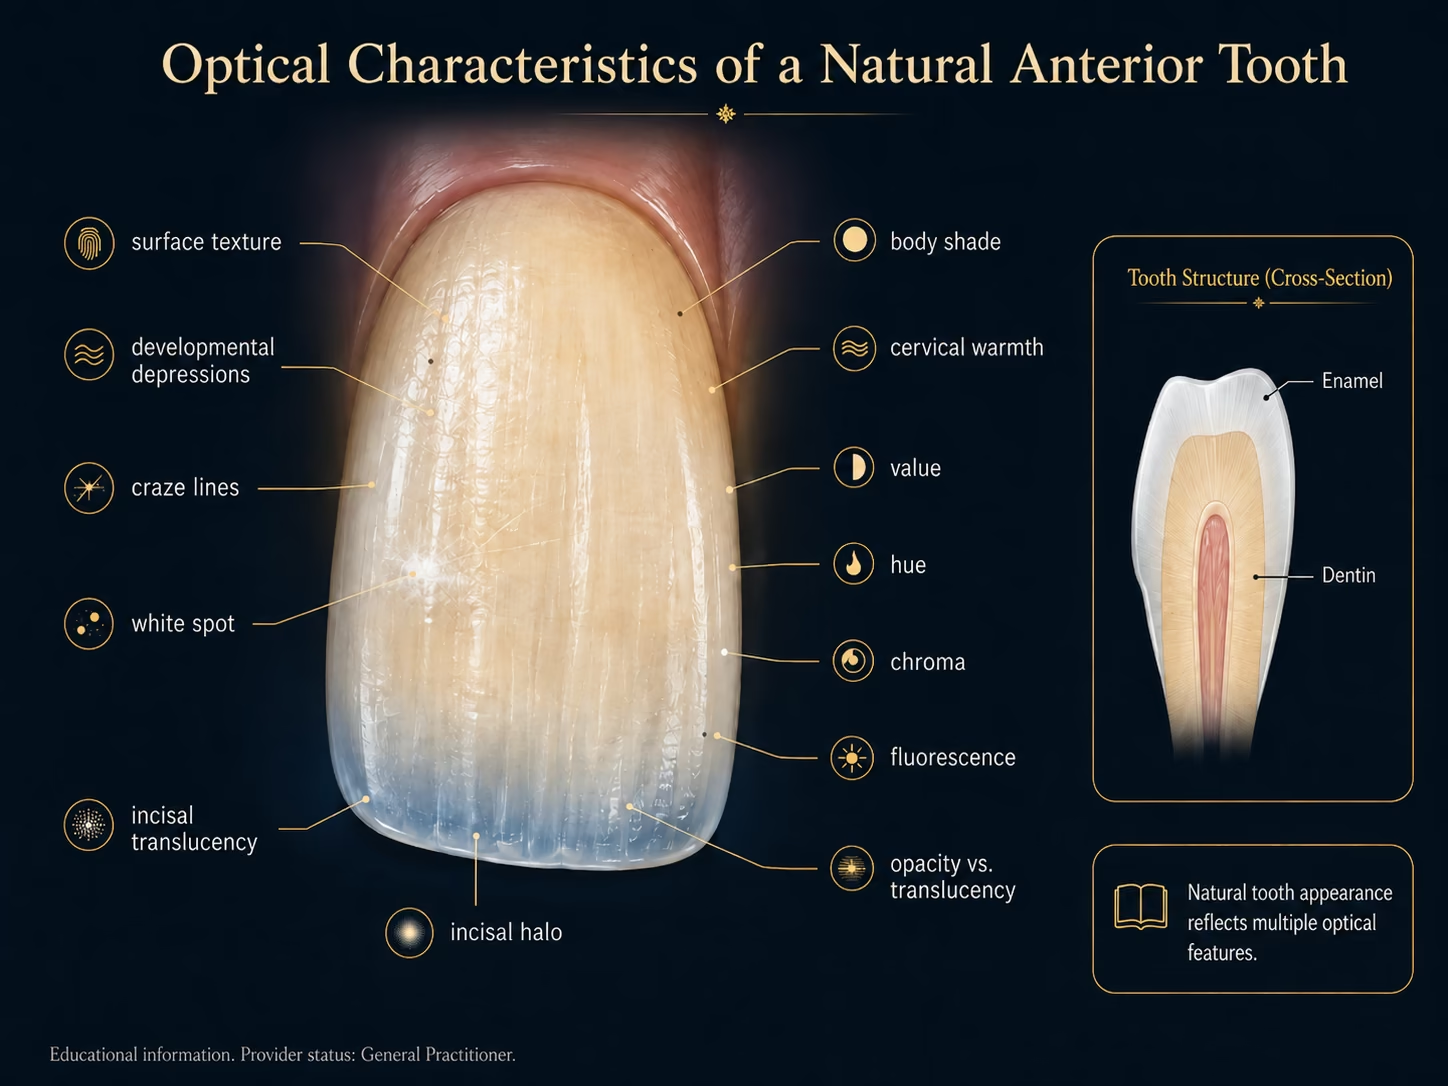
Labelled diagram of a natural anterior tooth showing translucency, surface texture, craze lines, white spots and cervical warmth.
Figure 13 (real patient image): What makes a natural tooth look natural, and what a single crown has to reproduce: incisal translucency at the biting edge, surface texture, craze lines and white spots, warmth toward the gumline, and the interaction of enamel and dentin that produces depth. These same features are what the old crown lacked.

Four steps were used to build a shade match: assess and communicate colour using high-quality photographs and shade guides; create a shade and tooth map recording translucency, white spots, texture and luminosity; assess the stump shade and the underlying tooth structure; and select an appropriate material based on both.

Shade selection

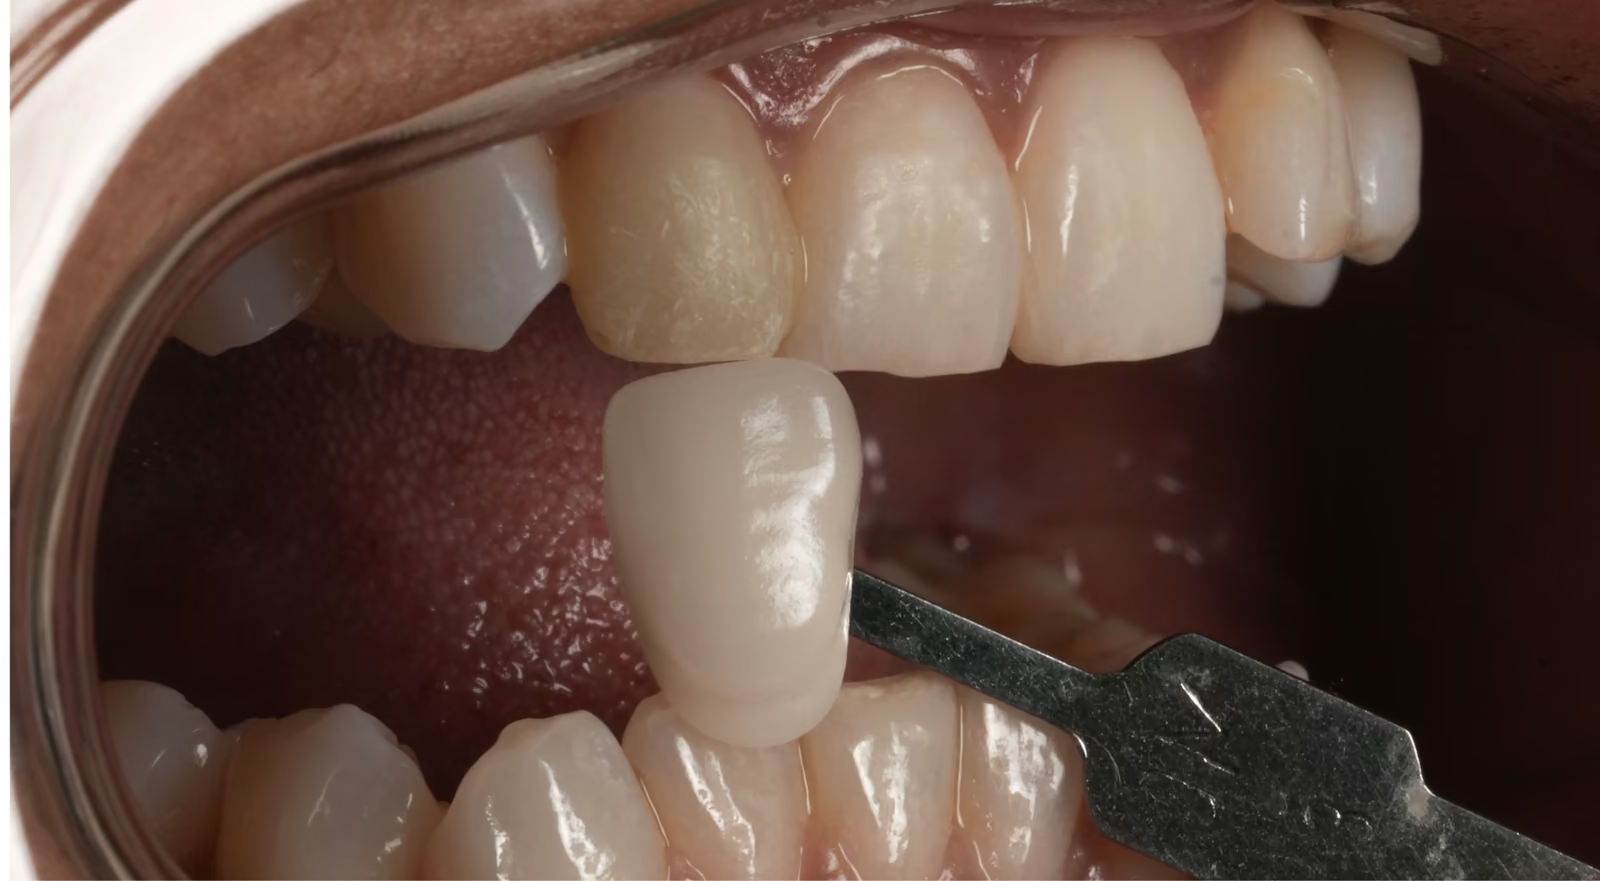
The first and most important step is taking high-resolution photographs with shade guides held against the teeth, so that tooth colour is calibrated against a known reference rather than described from memory. The most commonly used guides are the Vita guides; a Vita 3D-Master and additional secondary guides were used here. Roughly twenty to thirty images are taken in total, under varying lighting conditions, including the guide tab that is the closest match plus one shade lighter and one shade darker. Bracketing this way makes the match verifiable rather than a single judgement call.
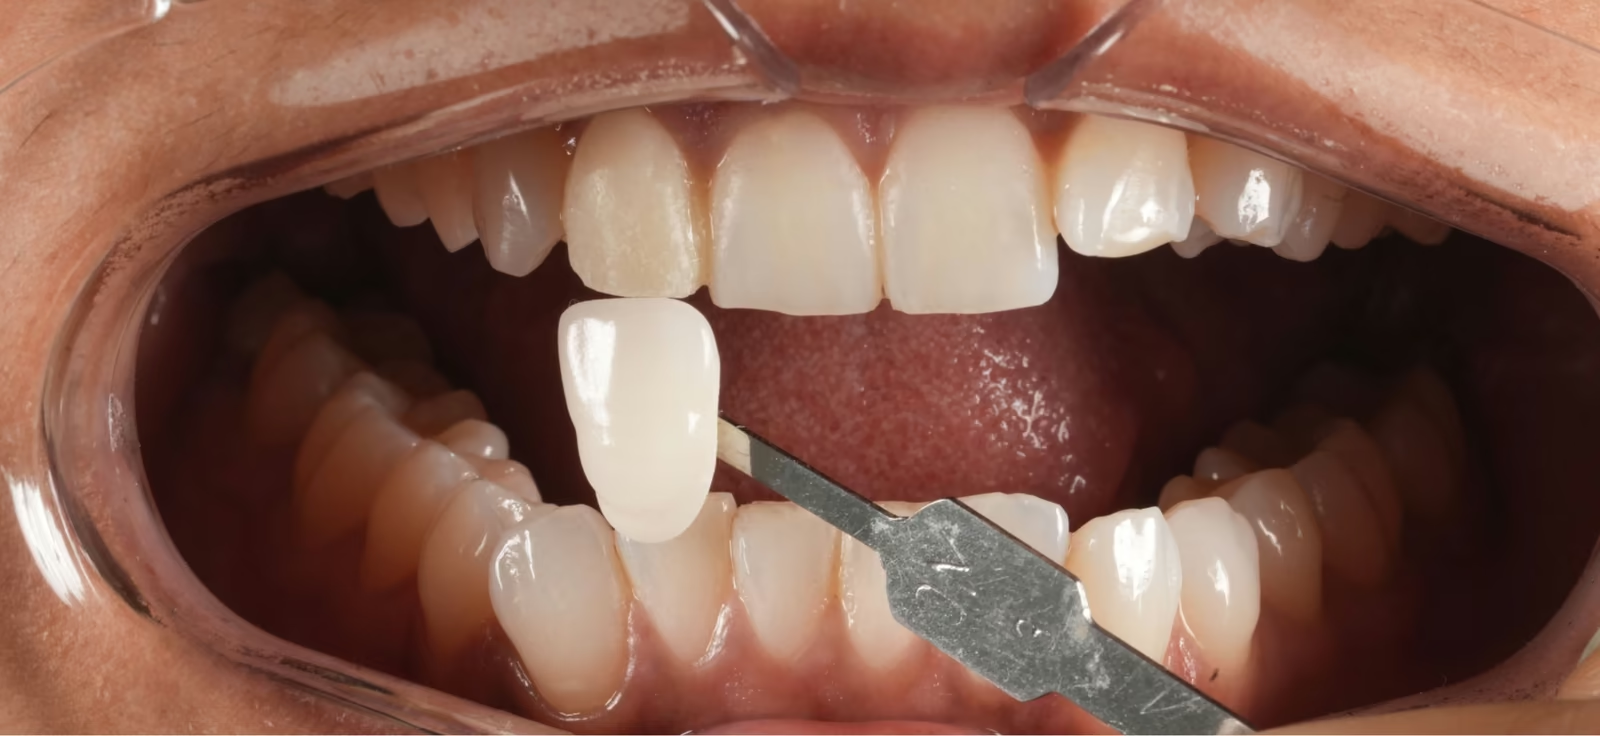
Dental shade guide tab held next to the upper front teeth during shade selection.
Figure 14 (real patient image): A shade guide tab held adjacent to the teeth for photographic calibration. Images are taken with the closest-matching tab and with tabs one shade lighter and one darker.
Wider intraoral view with a shade guide tab positioned during shade matching.
Figure 15 (real patient image): A wider view during shade selection. A tab that looks correct under one light source and angle can look distinctly too bright or too dark under another.
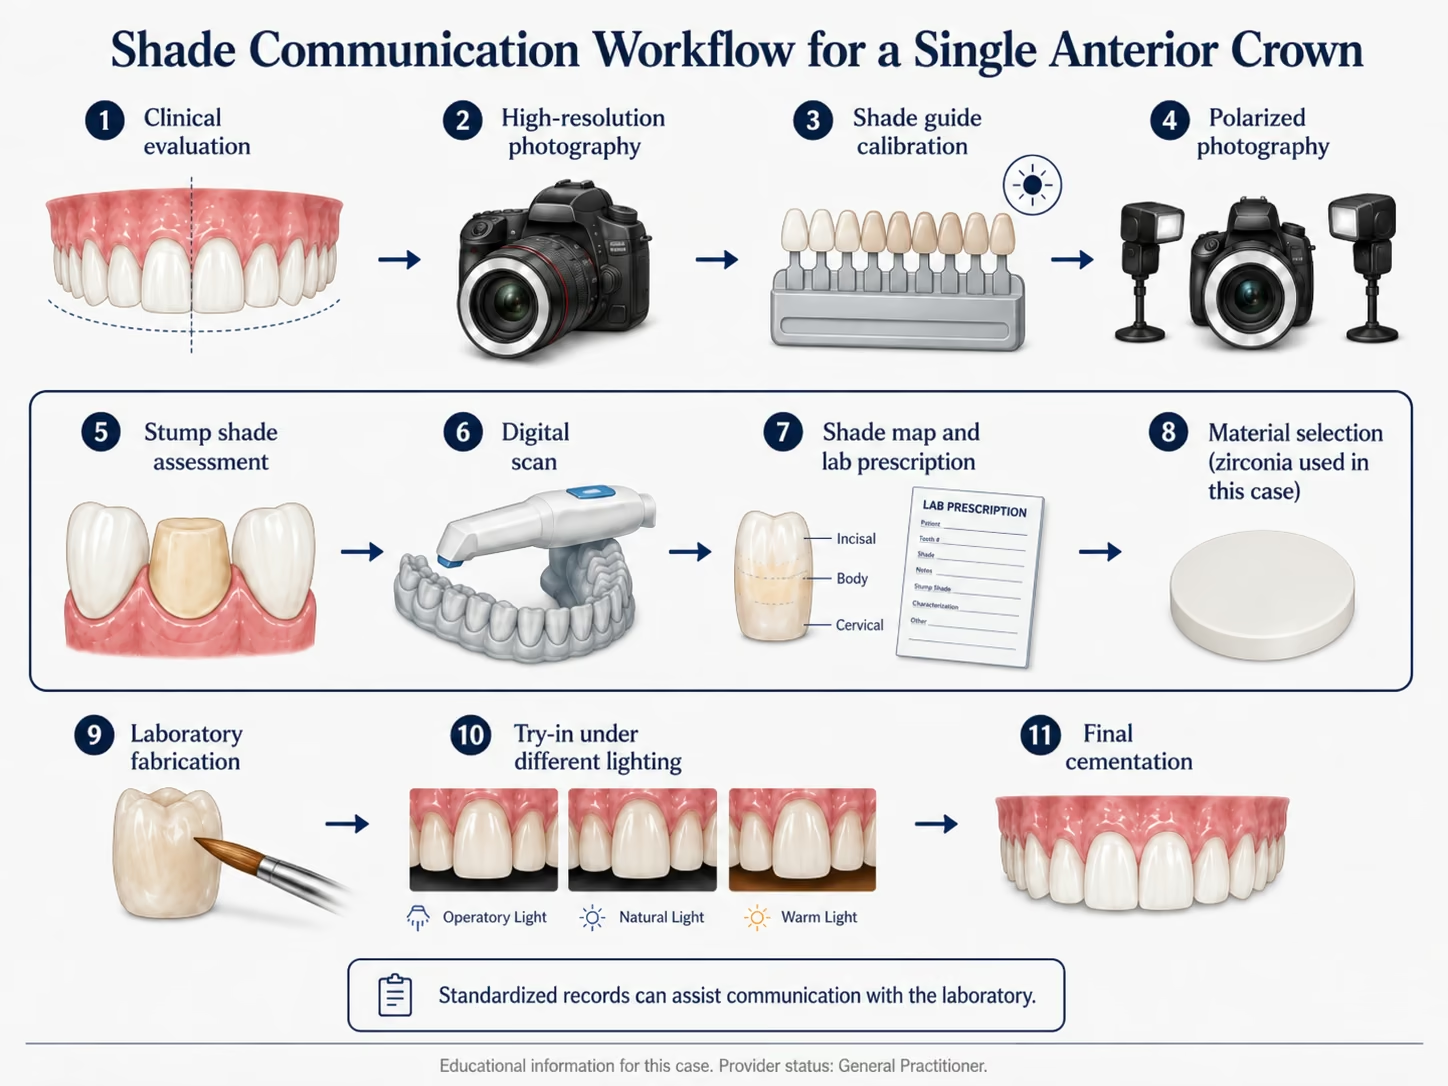
Diagram of the shade-taking sequence using shade guides, bracketing and cross-polarized photography.
Figure 16: How a shade is actually taken and communicated to the laboratory: clinical evaluation, high-resolution photography, shade-guide calibration, polarized photography, stump-shade assessment, digital scan, shade map and material selection.

A guide and colour that appear natural under one light source can appear too bright or too dark under another. For that reason, in demanding cases with complex colour and morphology, images are also taken with a camera and flashes fitted with polarizing filters. Cross-polarized light removes the surface reflections that normally sit on top of the tooth, letting the internal colour and characteristics be seen directly.

Black and white photograph of a camera fitted with polarizing filter panels used for dental shade photography.
Figure 17: Polarizing filters fitted to the camera flashes. Cutting surface glare allows the tooth's internal colour and characteristics to be recorded rather than the reflections sitting on top of them.

The shade map

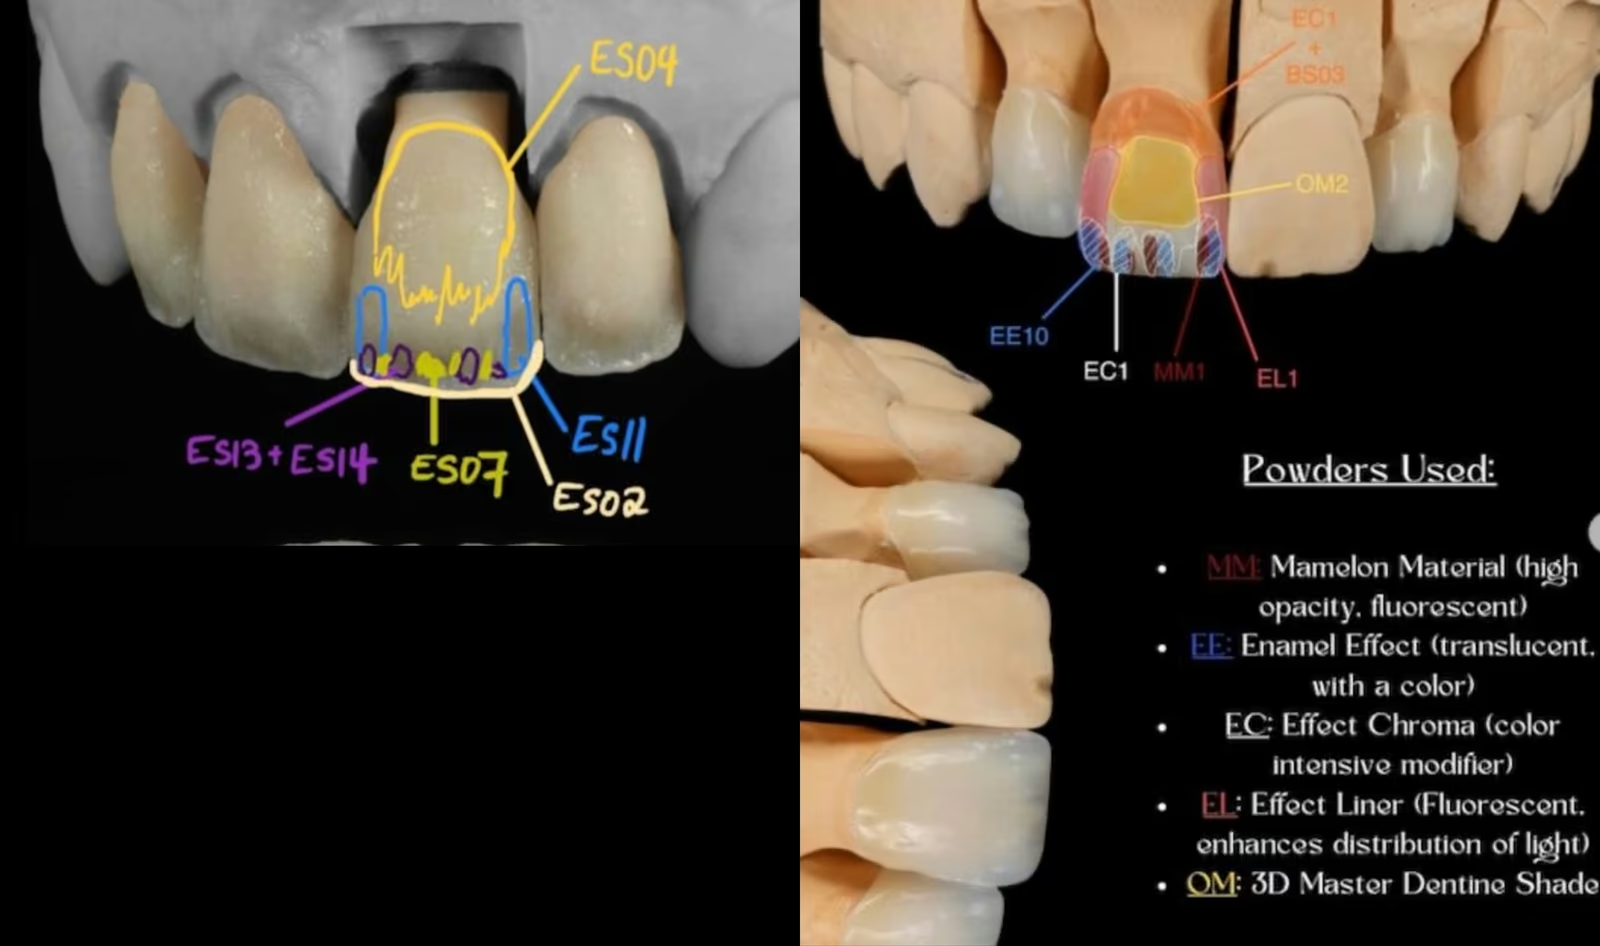
From all of this a shade map and laboratory prescription are created — a drawing of the tooth annotated with the level of texture, the sites of translucency, white spots, craze lines and other features, along with the powders to be used to reproduce them.

Annotated dental shade map prescription showing porcelain powder placement across the tooth.
Figure 18: (Real case image): The annotated shade map sent to the laboratory, mapping the placement of each porcelain powder — mamelon material, effect enamel, effect chroma, fluorescent liner and dentine shade — against the features they are intended to reproduce.
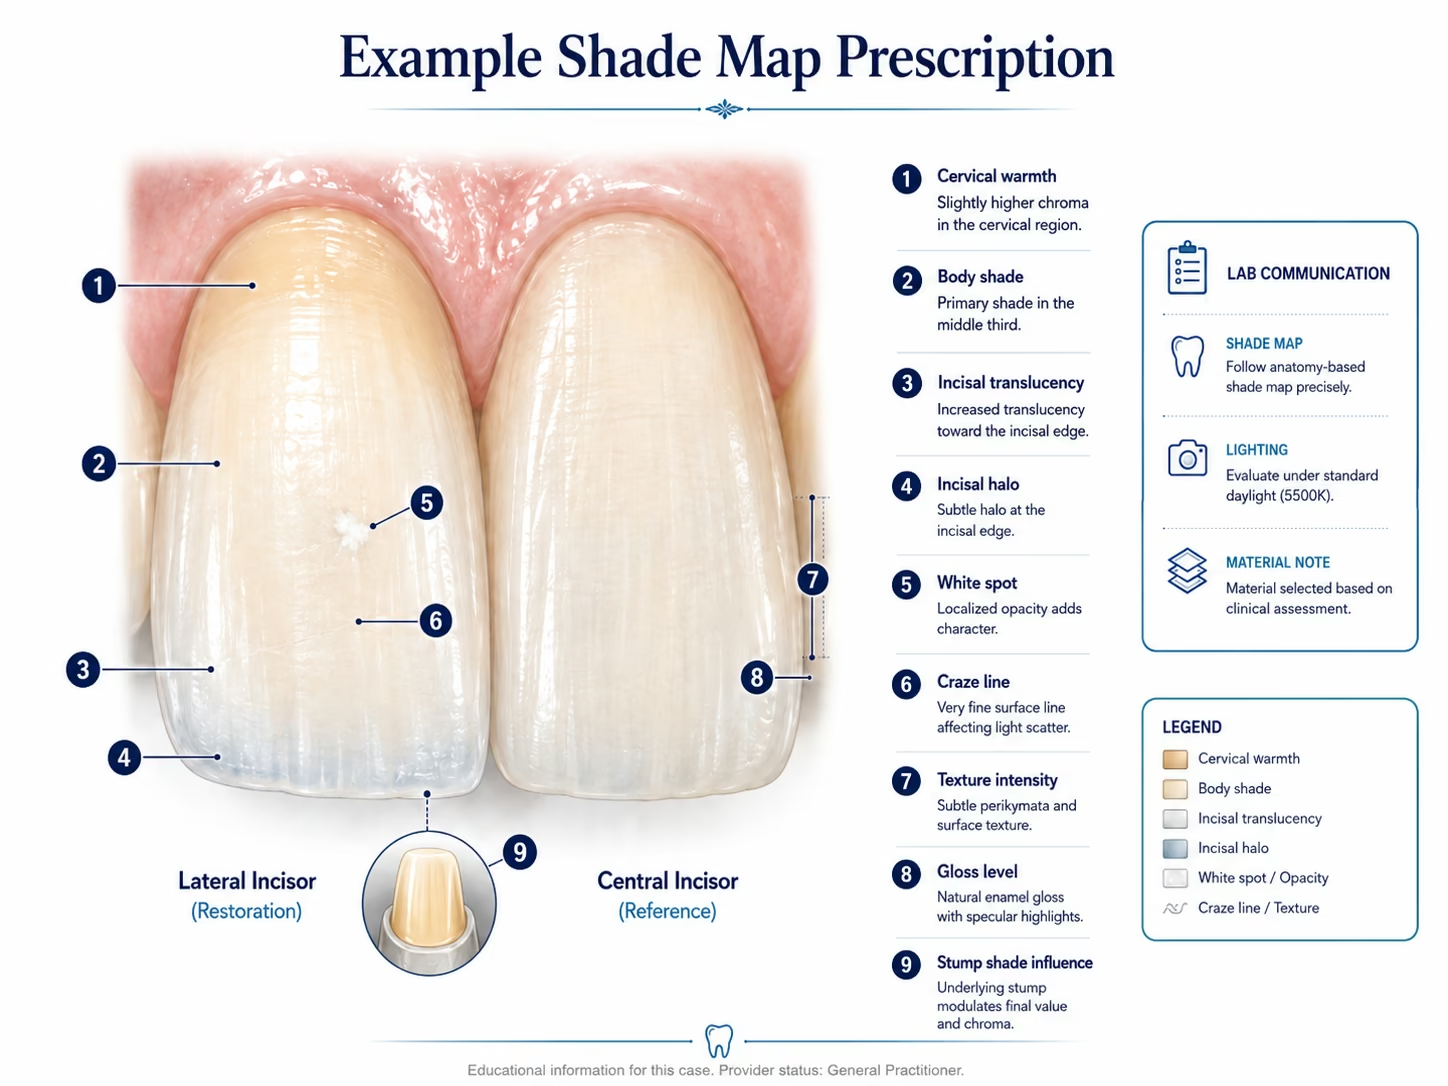
Example shade map prescription diagram with labelled optical features for laboratory communication.
Figure 20: What a shade map communicates to the laboratory: body shade, cervical warmth, incisal translucency and halo, white spots, craze lines, surface texture, gloss level and the influence of the underlying stump shade.

Fabrication

The second half of the procedure is carried out by a dental laboratory technician, who uses the digital scan and preparation design to mill the crown and then layer porcelain onto it to recreate the features specified in the prescription. Those porcelain powders are applied in thin increments, baked onto the crown, and the surface is then shaped and polished.

Milling technology has improved, and dentists are increasingly able to mill crowns in-office from a range of materials. Porcelain layering is a different proposition: it takes considerable artistry and practice, and for a case like this one, a single anterior tooth matched to its neighbour  it is difficult to reproduce chairside without an experienced laboratory technician.

At Sunny Dental Centre we work with a few laboratory technician who individually perform all our demanding cosmetic cases to ensure consistency and minimize individual clinical variation in technique and material.

Diagram comparing porcelain-fused-to-metal, zirconia and lithium disilicate crown constructions in cross-section.
Figure 21: Three common crown constructions compared: porcelain-fused-to-metal, zirconia, and lithium disilicate (e.max). Material choice depends on the stump shade, the preparation and the case — here, a dark underlying tooth pointed toward zirconia. Material selection depends on clinical factors.

The final crown was made from zirconia, chosen specifically because of the darkness of the stump shade seen earlier. Zirconia is more opaque than glass ceramics such as lithium disilicate, and that opacity is an advantage when there is a dark underlying tooth to mask. A more translucent material would have let that darkness show through.

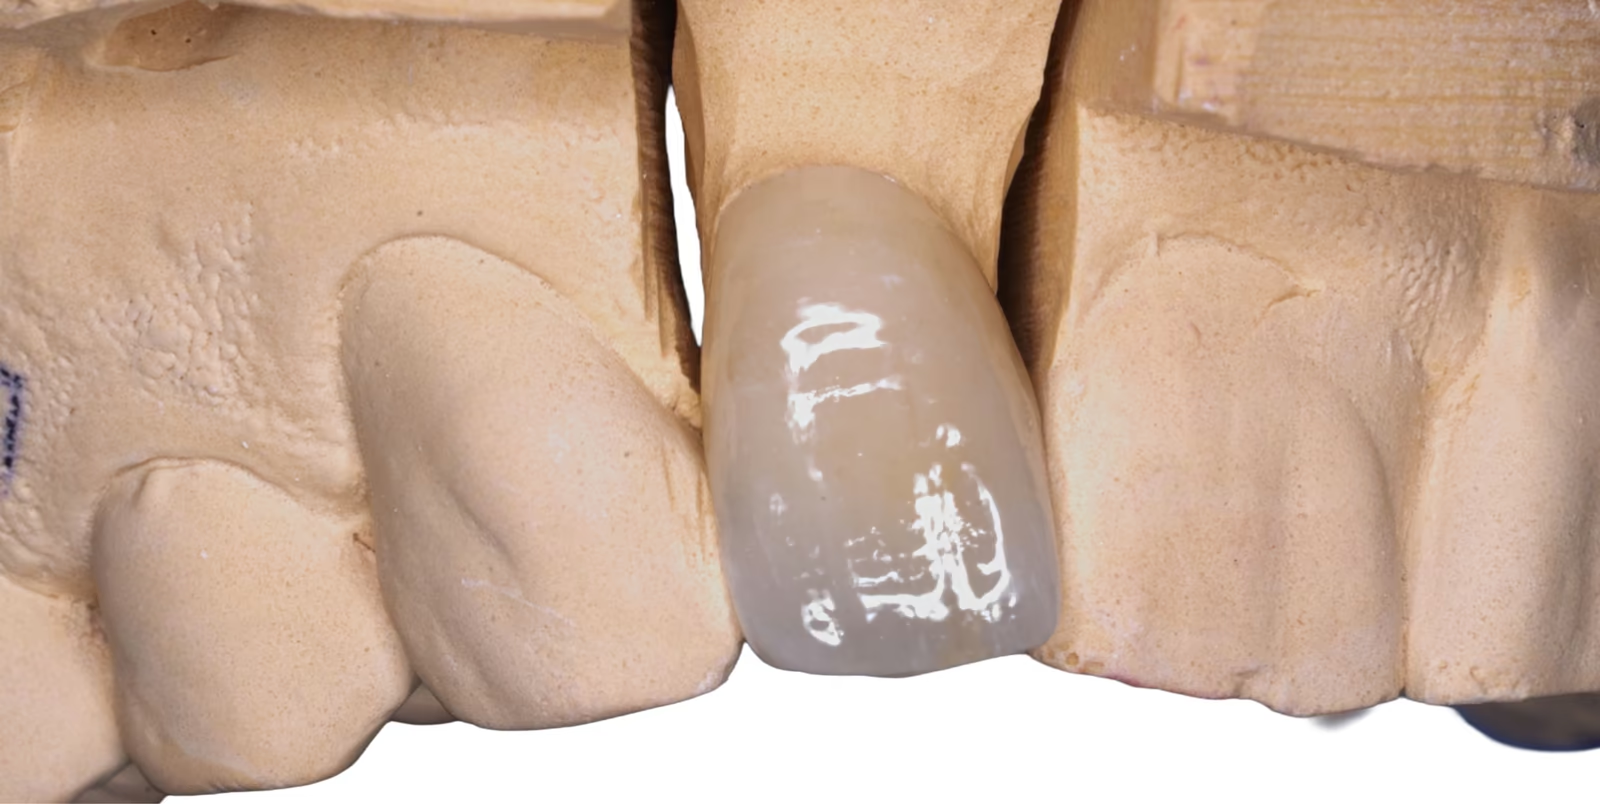
The crown was built as a cutback design: a zirconia core with the facial surface reduced and layered in porcelain. This is a deliberate middle path. Full-contour monolithic zirconia carries no risk of the veneering porcelain chipping, but its characteristics have to be applied to the surface as stains and glaze. Fully layered porcelain reproduces internal features and translucency most convincingly but has the highest chipping risk. Cutback keeps the strength of a zirconia core while allowing genuine layered translucency where it is visible.

Close-up of the completed layered zirconia crown on a laboratory model.
Figure 22 (real clinical image): The completed crown on the model. Surface texture, translucency toward the biting edge and warmth toward the gumline were built in during layering rather than applied as surface stain.

Delivery

The crown was tried in and assessed under several lighting conditions, and the patient was asked to evaluate its appearance in natural light. If a crown does not meet the functional or aesthetic requirements at this stage, it is resubmitted to the laboratory for modification rather than cemented. In many cases it is normal

One point worth knowing: a crown's appearance shifts slightly in the days after placement. Porcelain that has been out of the mouth is dry, and it rehydrates once seated, typically settling into a more natural appearance. The bite was checked and balanced at delivery, and the crown was cemented with a resin-modified glass ionomer cement for the margin reasons described earlier.

Smile view and retracted close-up of the completed lateral incisor crown after treatment.
Figure 23 (real clinical image): The completed crown in place, shown in a smile view and a retracted close-up. Individual results vary; what is achievable in any case depends on the tooth, the adjacent teeth and the underlying colour being matched to.

Protecting the result

The old crown broke down on its tongue-facing surface, and that breakdown was attributed to heavy wear and clenching and grinding. Replacing the crown without addressing the force that damaged the last one would leave the same problem in place.

A night guard was provided. Worn during sleep, an occlusal guard separates the teeth and takes grinding forces onto the appliance rather than onto the teeth and restorations. The bite was also balanced at delivery so that the new crown was not carrying more force than its neighbours.

Two honest caveats. A night guard protects the crown while it is being worn, and does not stop clenching itself. And there is an important distinction worth raising with any dentist recommending one: night guards are appliances for tooth wear, not treatment for sleep-disordered breathing. If snoring, daytime sleepiness or witnessed pauses in breathing are part of the picture, that is a separate medical conversation and should be raised rather than assumed to be handled by the guard.

Ongoing maintenance is the rest of the answer: brushing and flossing around the margin, where recurrent decay begins, and hygiene visits on your recall schedule so the margin is checked before a problem becomes a replacement.

Risks and limitations

No restoration is permanent, and a crown replacement carries specific risks worth stating plainly:

  • Crowns have a finite lifespan. Pooled five-year survival for tooth-supported single crowns sits around 92–97% depending on material [1]. Those are averages from grouped studies; your own outcome depends on your bite, hygiene and habits. Personal clinical experience have shown crowns routinely last over 15 years.
  • The nerve can be affected later. Preparing a vital tooth for a crown carries a risk of the nerve dying over time. In a long-term follow-up of vital teeth restored with single metal-ceramic crowns, pulp vitality survival was about 84% at ten years and 81% at fifteen years [2]. This is why vitality is tested before each crown preparation.
  • Layered porcelain can chip. The trade-off described above is real: veneered zirconia restorations show higher rates of veneering-ceramic fracture than metal-ceramic crowns in pooled data [1]. Cutback design and a balanced bite reduce the exposure; they do not eliminate it.
  • Recurrent decay can happen again. The margin remains the vulnerable junction. Hygiene and regular examination are what protect it.
  • A single-tooth match has limits. Matching one crown to natural neighbours is among the harder tasks in dentistry, and a perfect match cannot be promised. Sometimes it is not even possible to obtain a close shade match. To ensure good fit and shade match, the crown is assessed in on the tooth before cementation and, if it does not meet the goal, sent back before it is cemented.
  • Temporary crowns are temporary. They can loosen or come off, and need care while in place.
  • It may not match on the first delivery attempt. Getting a satisfactory shade and form match on the first delivery appt does not always occur.Especially if we are assessing critically. In this case it will be sent back and the patient would be in a temp again or another week or two.

Patient questions

Was dental anesthesia, "freezing", needed?

Yes. Crown removal and preparation ordinarily require local anesthetic, and it was used in this case.

Will I have pain afterwards?

In this case, replacing a crown required minimal additional tooth removal and preparation, and the patient reported no post-operative pain. That is commonly the case after crown replacement. Some patients experience pressure discomfort, most often when the bite is not perfectly balanced — which resolves within a few days or after a small adjustment. In select cases pain can be experienced or teeth can develop pulpits.

What precautions are needed while the temporary crown is in?

Specific instructions were given: avoid hard foods that can fracture the temporary, minimize staining foods and drinks, avoid sticky foods that can pull it off, and floss by pulling the floss out sideways rather than up and down so the temporary is not dislodged. If a temporary does come off, keep it and call the office.

Diagram of temporary crown care instructions: avoid sticky and hard foods, minimize staining foods, brush gently, floss out sideways, expect mild sensitivity, and call the office if the temporary comes off.
Figure 24: Temporary crown care, at a glance. A temporary protects the tooth until the final crown is delivered; sticky and hard foods, and flossing straight up and down, are the usual ways one comes loose.

And after the permanent crown is cemented?

Treat it like a temporary for the first day. After that, eat and drink normally — but avoid what you should avoid with any tooth: chewing ice, opening packaging with your teeth, and biting anything genuinely hard.

Do I need a root canal before a crown?

Not routinely. A root canal is needed when the nerve is irreversibly inflamed, infected or dead — not simply because a crown is planned. In this case the nerve was healthy and no root canal was required. Where decay has reached the pulp, root canal treatment comes first, and the crown follows.

Can't you just fill the decay instead of replacing the whole crown?

Sometimes, if the decay is small, accessible at the edge and the crown is otherwise sound. More often the decay tracks underneath the crown where it cannot be seen or fully removed, and patching the visible part leaves the rest in place. Here the crown also had structural breakdown on the tongue side, which settled the question.

Why does my old crown look darker than my other teeth?

Usually one of three things: the crown was matched to teeth that have since changed colour, the material lacks the translucency of natural enamel, or a metal substructure is showing at the gumline as tissue recedes. Whitening will not change a crown — crown materials do not respond to bleaching — which is why whitening is planned before crown work, not after.

How long will this crown last?

There is no honest single number. Pooled research puts five-year survival in the low-to-mid nineties for most crown types [1], and this patient's previous crown lasted over twenty years. Bite forces, grinding, hygiene and the health of the underlying tooth all move that figure.

Where this is heading at Sunny Dental Centre

Materials and techniques and the technology implemented in this area continue to evolve, and a few developments are worth naming factually. This are some of the technology we plan on implementing or have already implemented.

Diagram of current and developing tools in single-tooth crown replacement: shade measurement devices, digital photography, digital shade analysis, CAD/CAM systems, 3D printing and multilayer ceramics.
Figure 25: Some of the current and developing tools in single-tooth crown replacement — shade measurement devices, digital photography and shade analysis, CAD/CAM systems, 3D printing, and multilayer ceramics. Availability and suitability vary by case.

Shade measurement instruments. Our clinic has adopted a dental spectrophotometer (the Borea Cobra). Rather than judging colour by eye against a guide, the device measures reflected light across the visible spectrum — roughly 400 to 700 nanometres — and reports the result in standard colour coordinates, which feed into a shade map [3]. What it changes is the record: colour becomes a measured, repeatable number that can be communicated to a laboratory rather than a description. What it does not change is the judgement. An instrument reads a point on a tooth; deciding what a whole restoration should look like beside its neighbour, under that patient's lighting and in that patient's face, remains clinical work.

Digital design and 3D printing. Printing is already routine for models and provisional restorations, and printed definitive restorative materials are an active area of study. Systematic reviews of digital and machine-learning applications in this field describe genuine potential alongside a clear caveat: methods still need standardization and rigorous validation before broad clinical adoption [4]. That is the accurate position today, and we would rather state it than overstate it.

Sources

  1. Sailer I, Makarov NA, Thoma DS, Zwahlen M, Pjetursson BE. All-ceramic or metal-ceramic tooth-supported fixed dental prostheses (FDPs)? A systematic review of the survival and complication rates. Part I: Single crowns (SCs). Dent Mater. 2015;31(6):603–623.
  2. Cheung GSP, Lai SCN, Ng RPY. Fate of vital pulps beneath a metal-ceramic crown or a bridge retainer. Int Endod J. 2005;38(8):521–530.
  3. Borea. Cobra dental spectrophotometer — technical specifications. Manufacturer documentation. (Technical parameters only; no outcome claims are drawn from this source.)
  4. Rokhshad R, Khosravi K, Motie P, Sadeghi TS, Tehrani AM, Zarbakhsh A, Revilla-León M. Deep learning applications in prosthodontics: a systematic review. J Prosthet Dent. 2025;135(3):539–551.

Sunny Dental Centre is a general dental practice. Dr. Mandip Puri, DDS, is registered with the Royal College of Dental Surgeons of Ontario as a general practitioner, not a specialist. Individual results vary; what is achievable depends on your teeth, bite and goals. All patient photos and figures are property of Dr. Puri from Sunny dental centre and not permitted for reuse or redistribution.

Questions about crowns or a tooth that keeps giving you trouble? Sunny Dental Centre, Guelph — +1-519-824-8250.

Explore Cosmetic Dentistry in Guelph
SUNNY DENTAL

7 Riverview Drive, Guelph, Ontario, N1E 3R6,
Canada

519-824-8250Sunnydental@yahoo.comCall UsBook Online
Office Hours

Mon:  10:00am - 7:00 pm
Tu/W: 8:00am - 5:00 pm
Thur:   9:00am - 4:00 pm
Fri - Sat 9:00 am - 3:00 pm (alternating)